Help Center
Getting Started
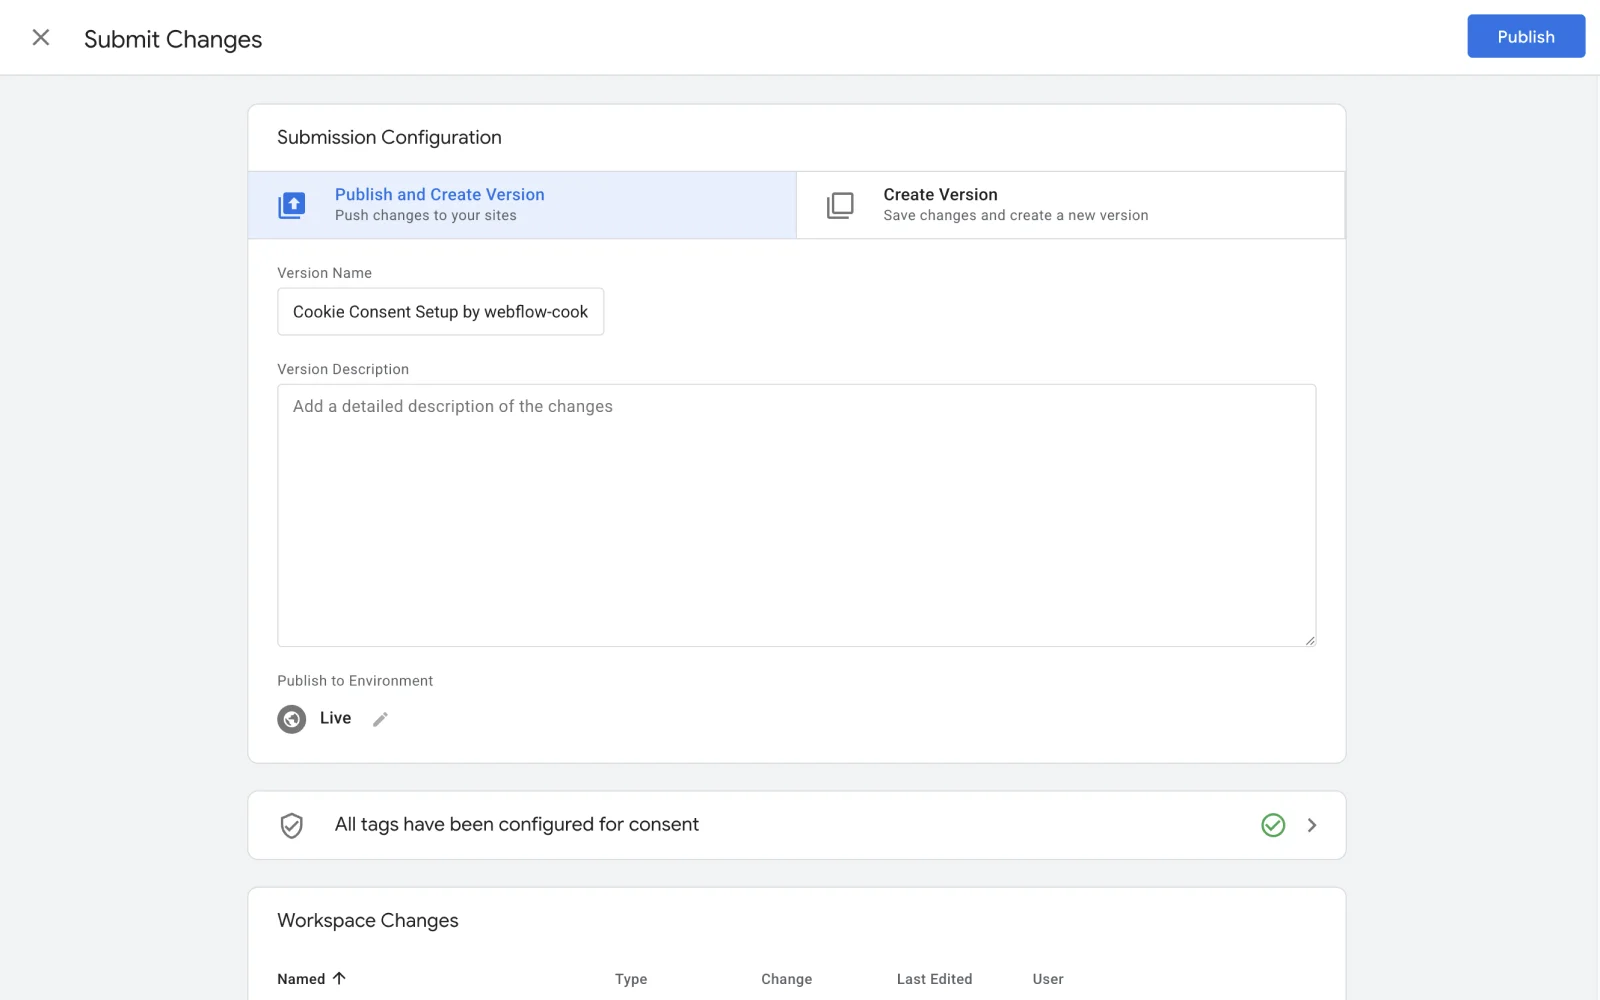
To deploy the Cookie Banner functionality including Consent Mode V2, follow these steps to publish the Google Tag Manager container changes:
- Go to Google Tag Manager and locate the relevant container
- Click the 'Submit' button located in the top right corner
- Add a version name and/or description (e.g. Cookie Consent Setup by webflow-cookies.com)
- Click the blue 'Publish' button
Using Google Fonts could expose your website to GDPR compliance risks due to Google's data collection practices. We recommend downloading the fonts and uploading them to Webflow as custom fonts.
Third-party widgets and embeds may also use Google Fonts. Follow this guide to check if your Webflow site uses Google Fonts and how to remove them.
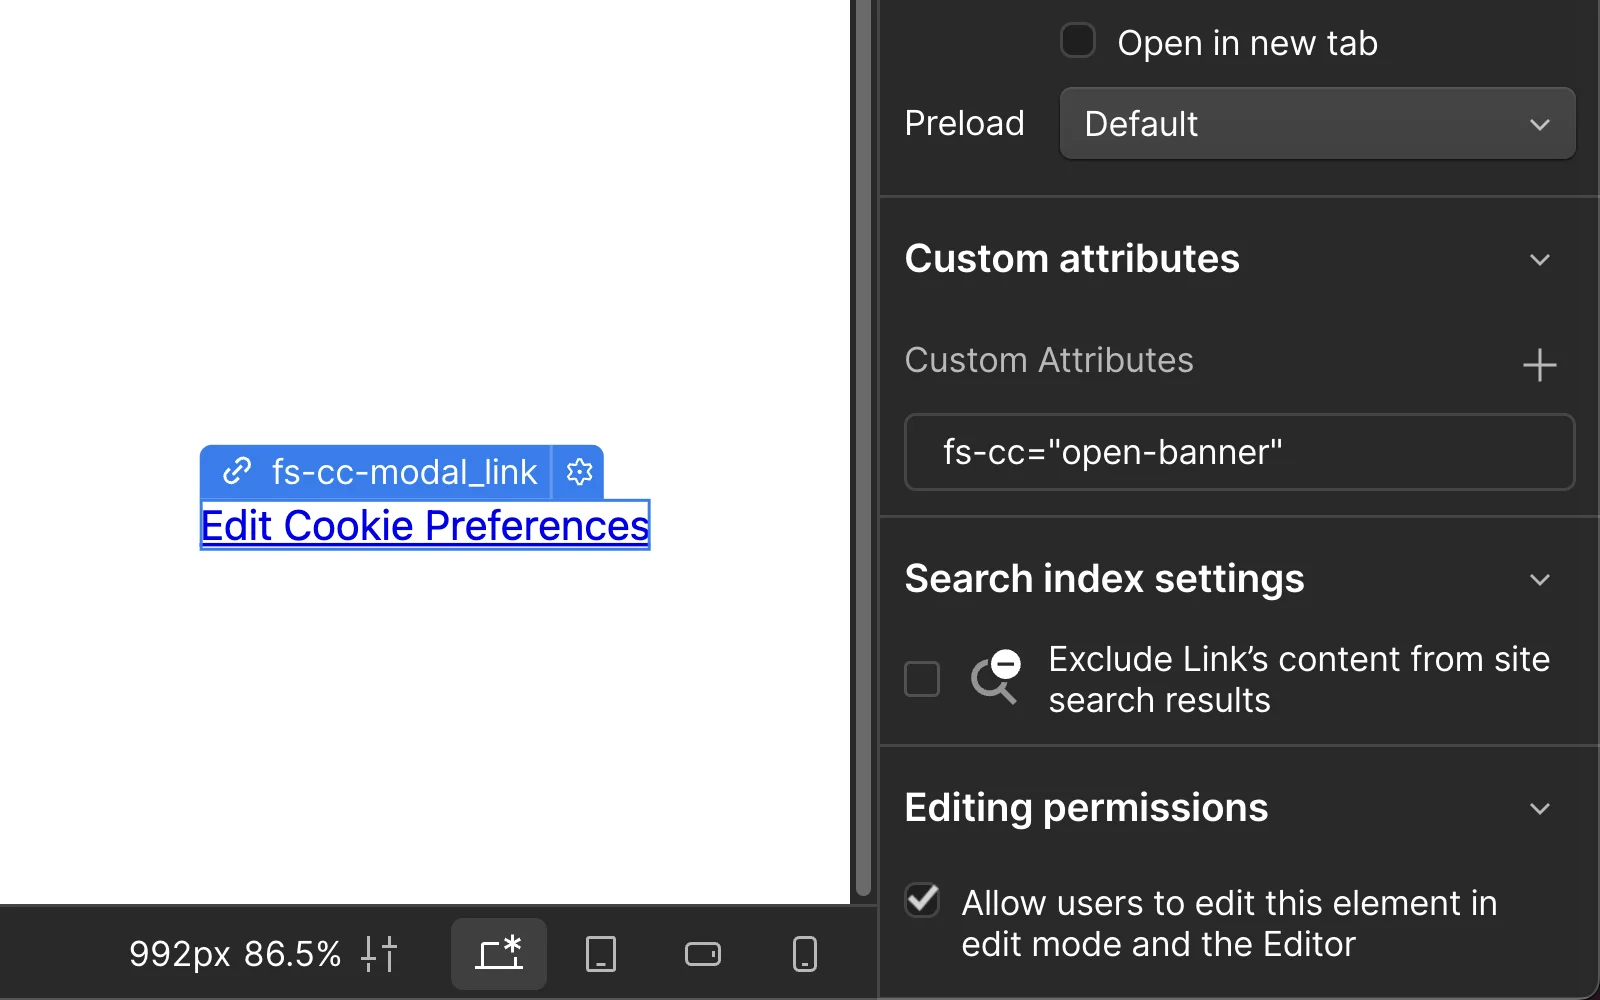
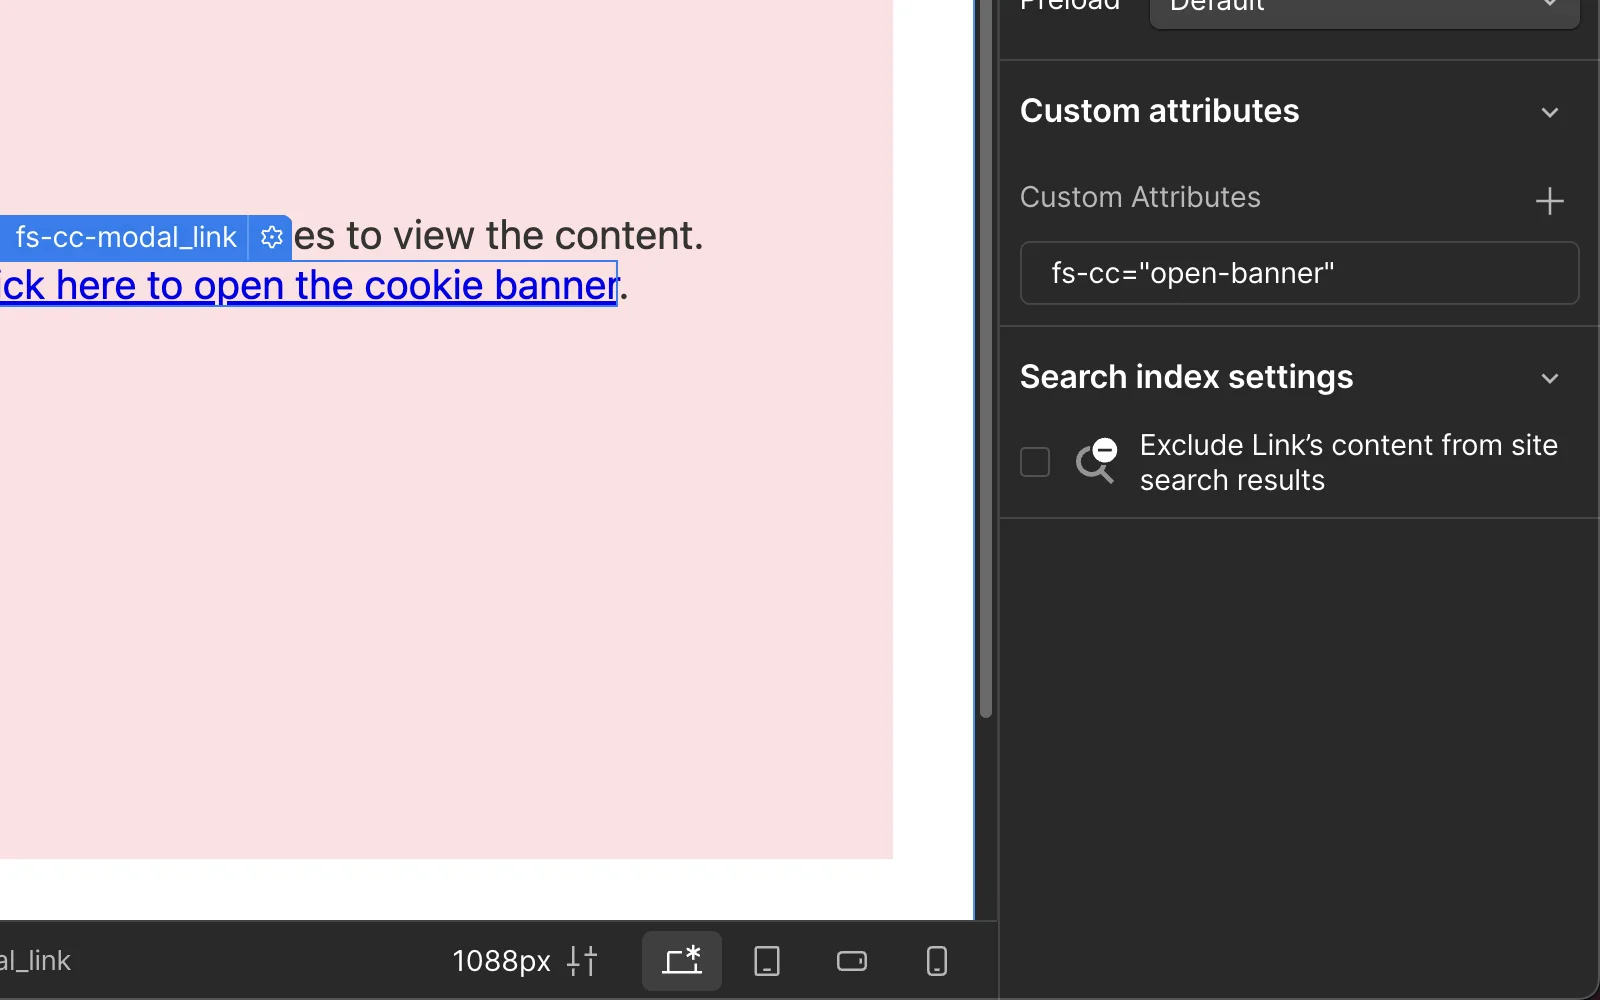
To allow users to reopen the Cookie Banner and update their existing preferences, add the fs-cc=”open-banner” attribute to a div block, link or image element in the Webflow Designer and publish the changes. Clicking this element on the production domain reopens the Cookie Banner.
Customization
Opt-in mode requires users to accept cookies before any tracking begins, providing maximum privacy protection. Opt-out mode loads cookies immediately, offering more convenience but less privacy control.
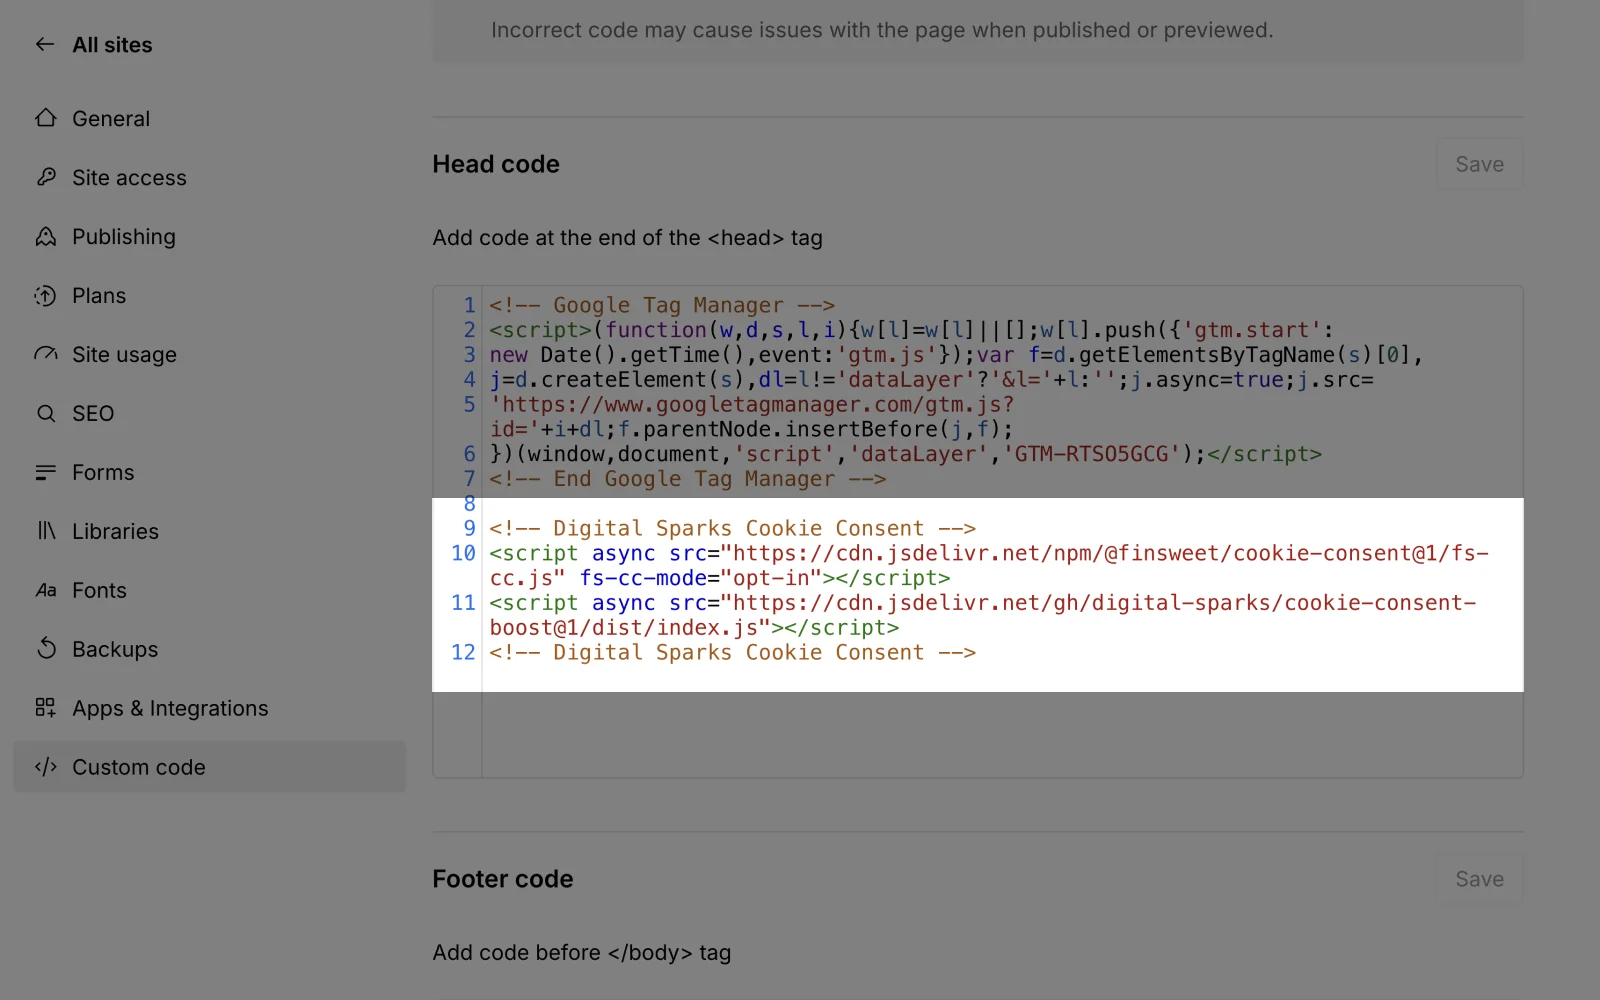
To change the cookie consent mode between opt-in and opt-out, navigate to the 'Custom Code' tab in the Webflow project settings. Locate the 'Digital Sparks Cookie Consent' script and change the value for the fs-cc-mode attribute based on your compliance needs:
- Use
fs-cc-mode="opt-out"for opt-out mode - Use
fs-cc-mode="opt-in"for opt-in mode
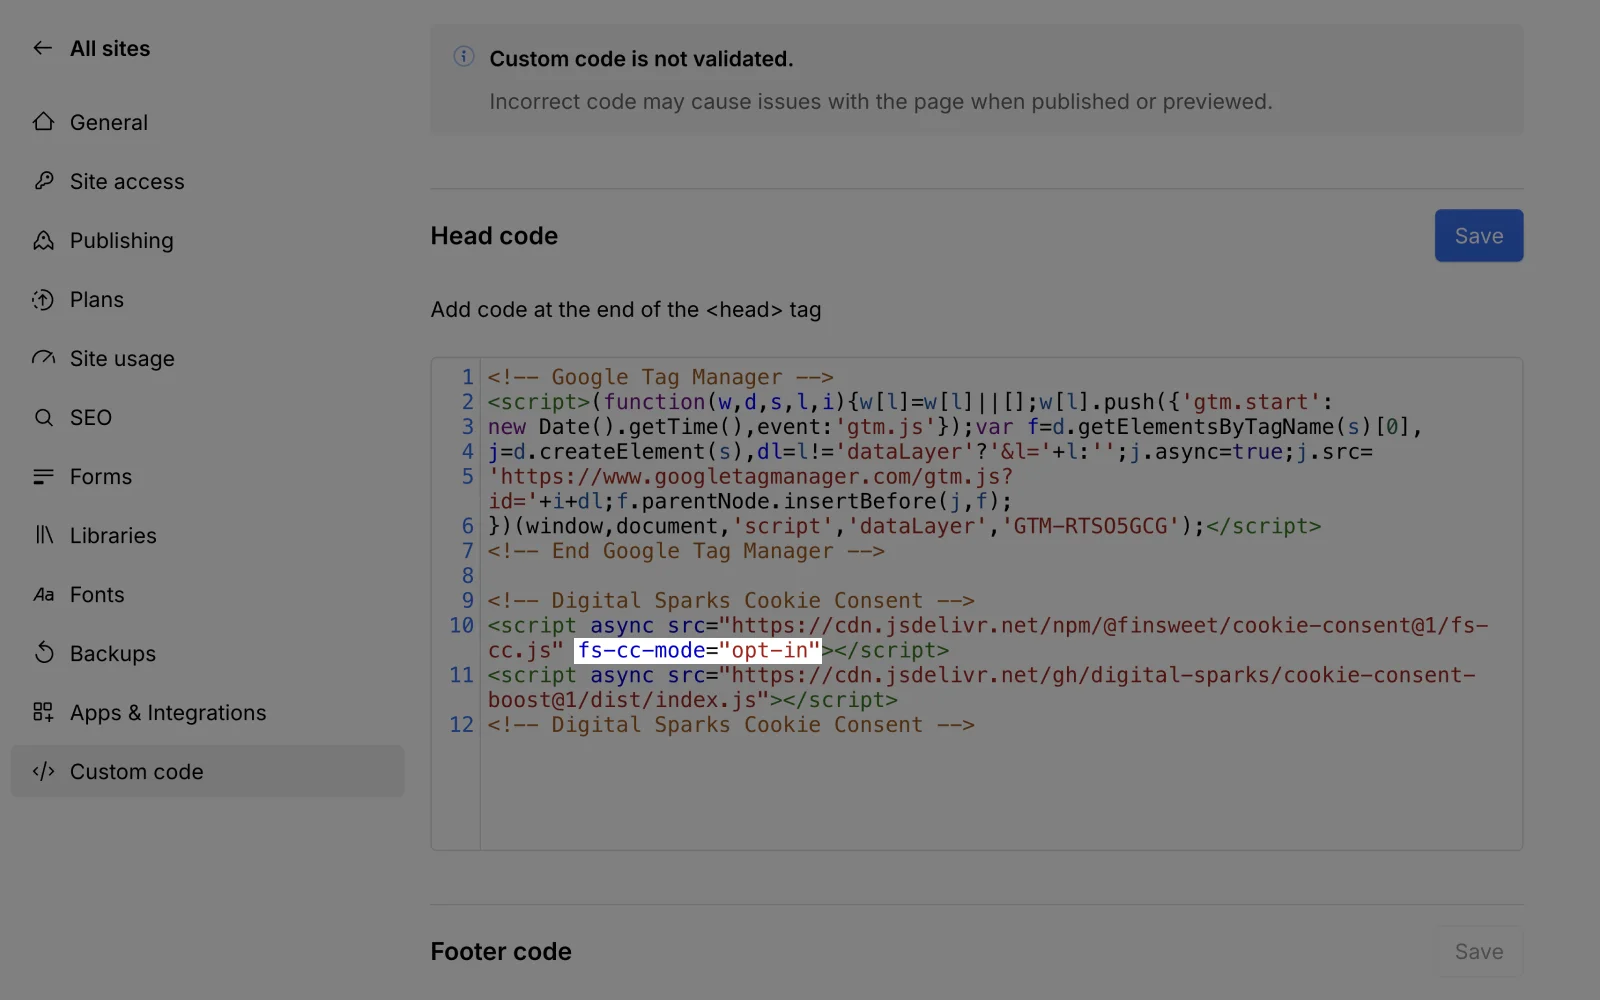
For businesses subject to EU Cookie Law, CCPA, GDPR, and similar privacy regulations, we strongly recommend using the 'opt-in' setting to ensure compliance.
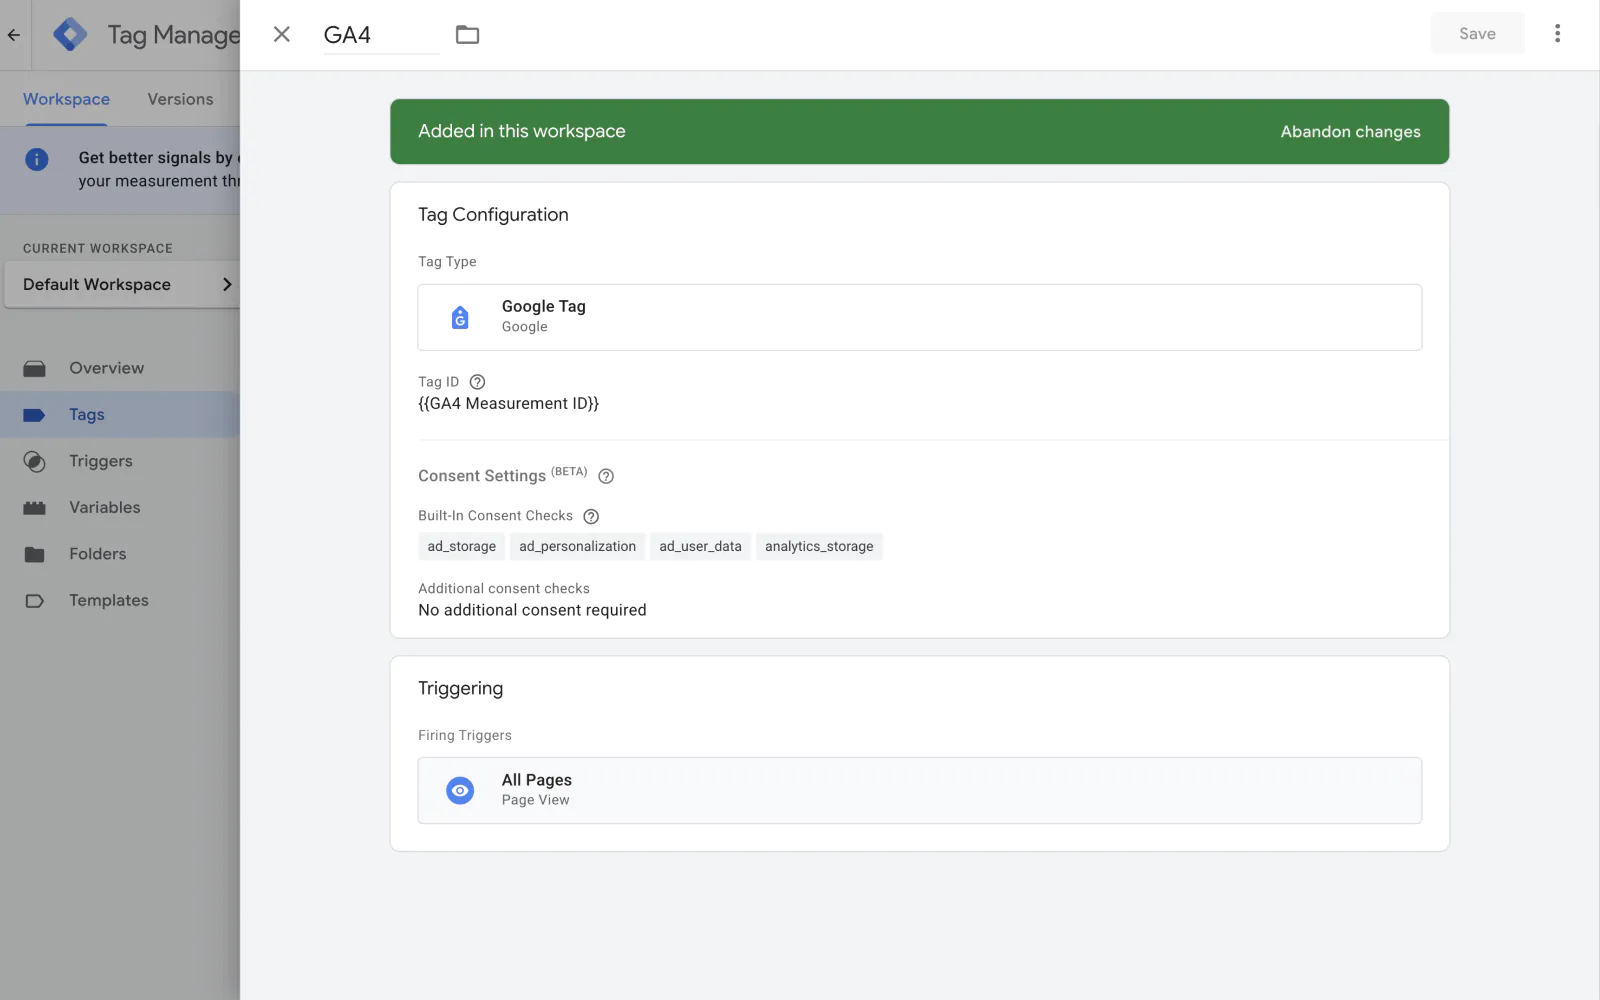
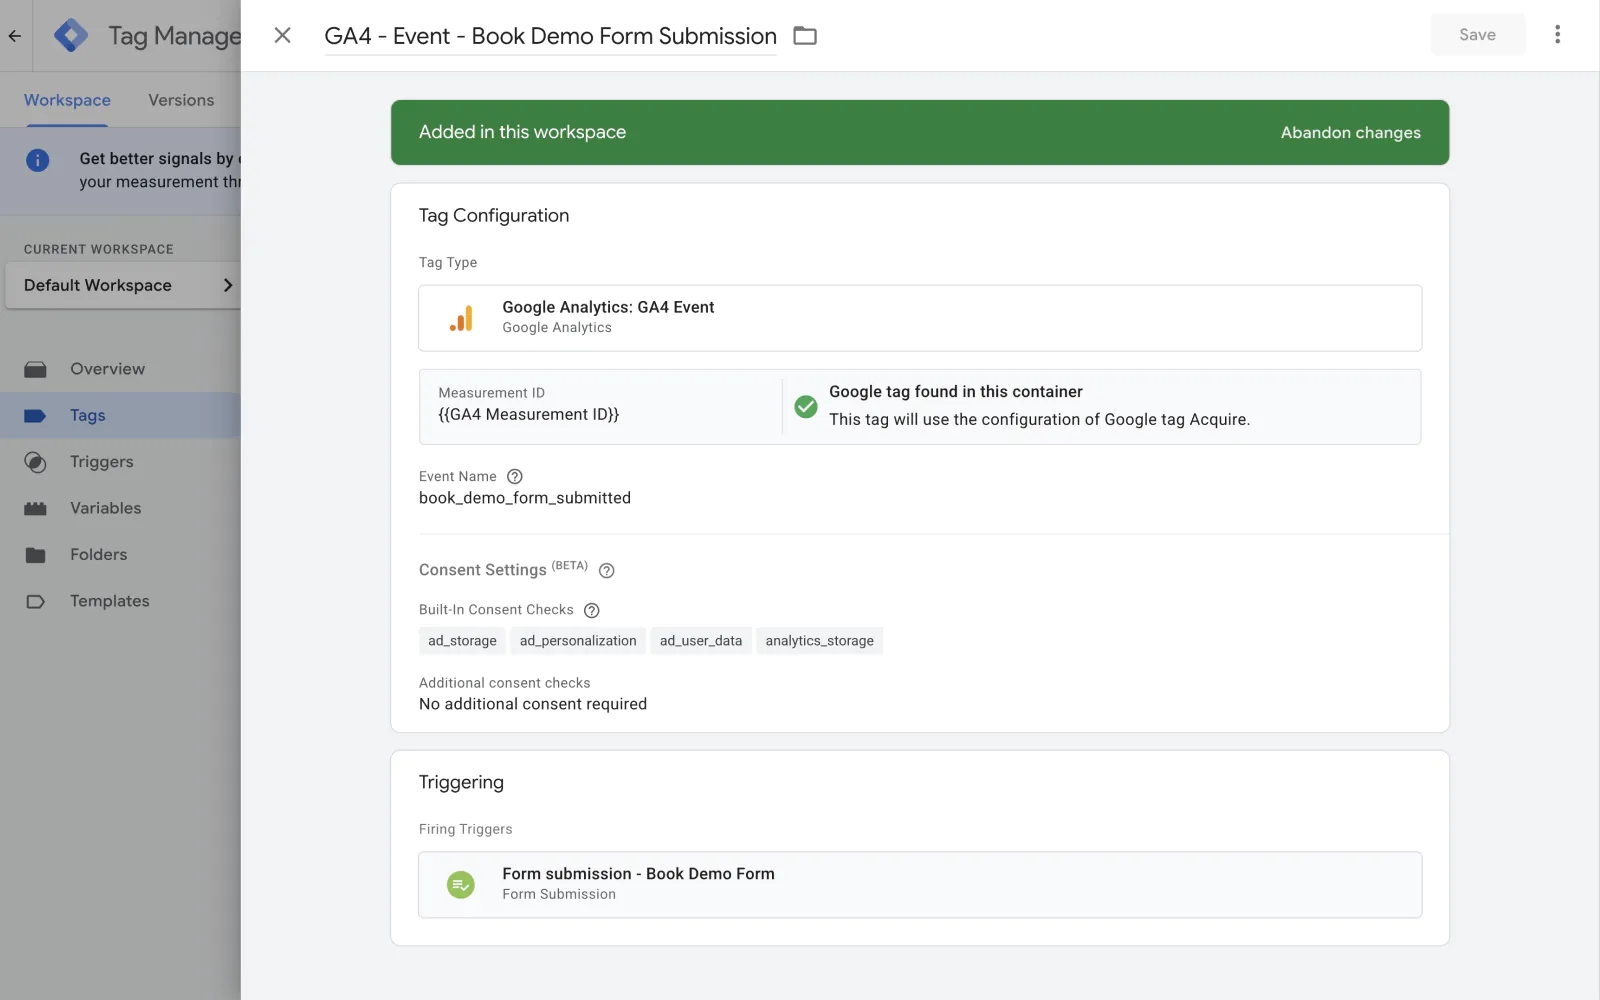
When adding a new tag to Google Tag Manager that places cookies in the user's browser (e.g., Google Analytics or third-party tracking scripts), you must first determine whether the tag uses Built-in Consent Checks functionality. Tags with Built-in Consent Checks automatically respect user cookie preferences without additional configuration.
To check whether a tag uses Built-in Consent Checks, locate the Consent Settings section when configuring your tag. Tags with this functionality enabled will display a "Built-in Consent Checks" section. Here are common tags with Built-in Consent Checks:
Google Analytics 4Google Ads Conversion TrackingGoogle Ads RemarketingMicrosoft ClarityFloodlight Counter/Sales tags

Tags WITH Built-in Consent Checks
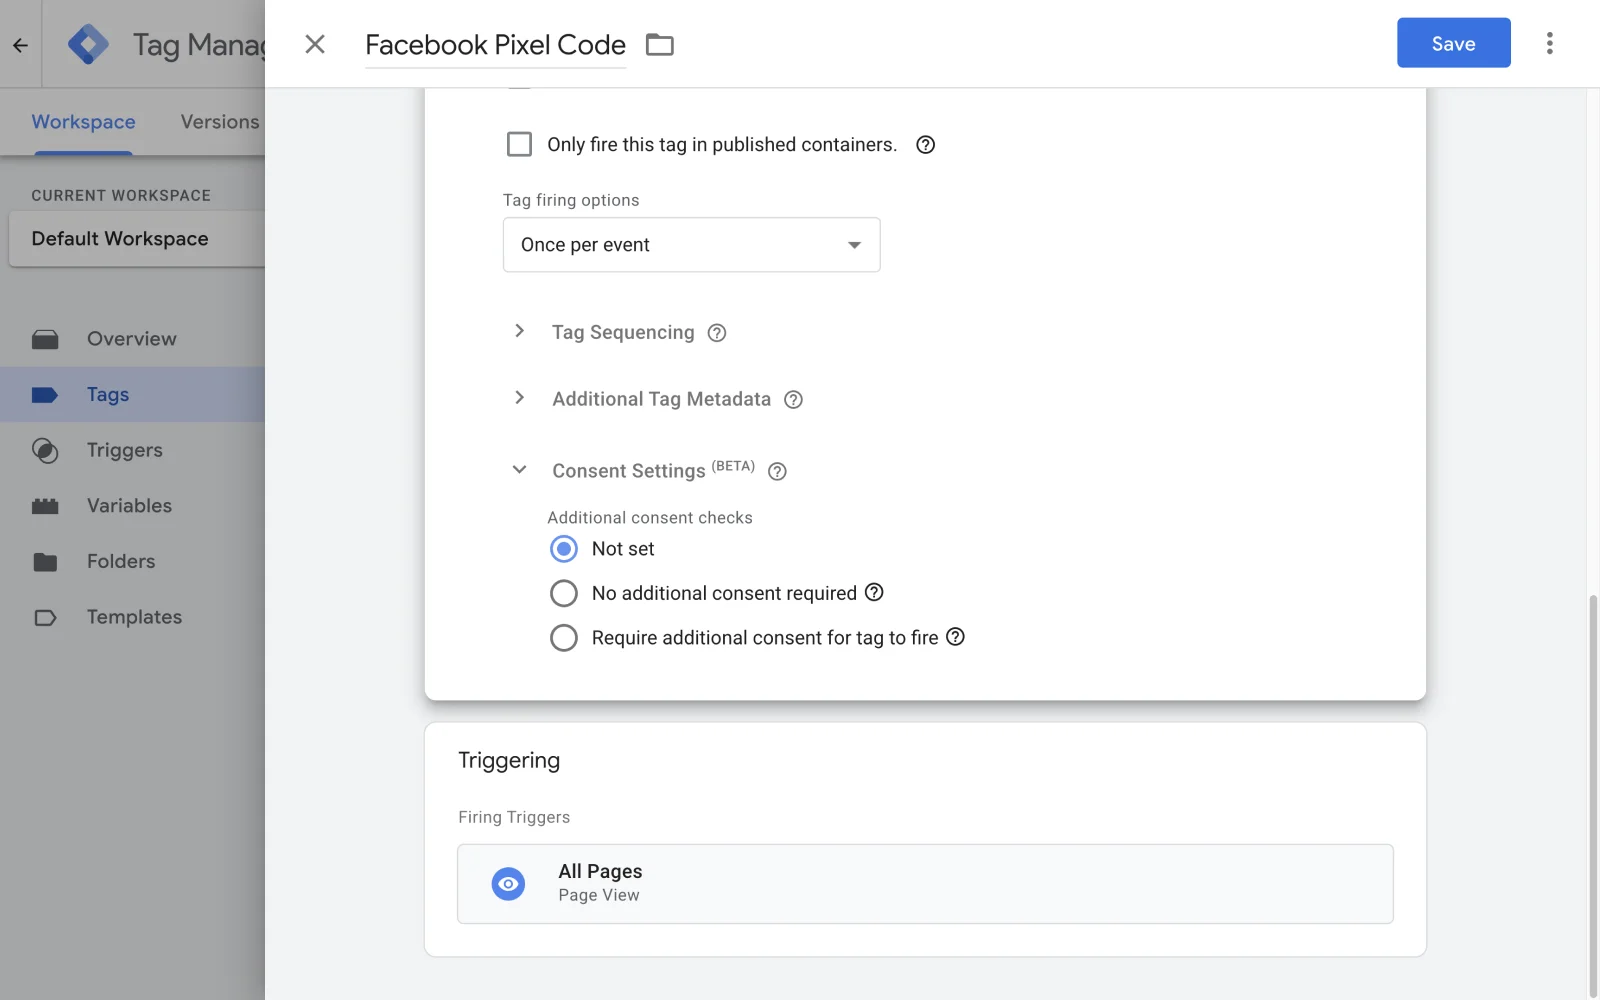
For tags with Built-in Consent Checks that should fire when the page loads (e.g., to track a page view), add a Page View trigger. Next, under the Advanced Settings dropdown, expand the Consent Settings dropdown and set the Additional consent checks value to No additional consent required.
This prevents double-checking consent since the tag's built-in functionality already handles consent verification internally. The tag will respect user consent preferences through its built-in functionality and fire appropriately based on granted permissions.
For tags with Built-in Consent Checks that track custom events (e.g., a form submission), add the desired custom trigger (e.g., Form Submission, Click trigger) and set the Additional consent checks to No additional consent required.
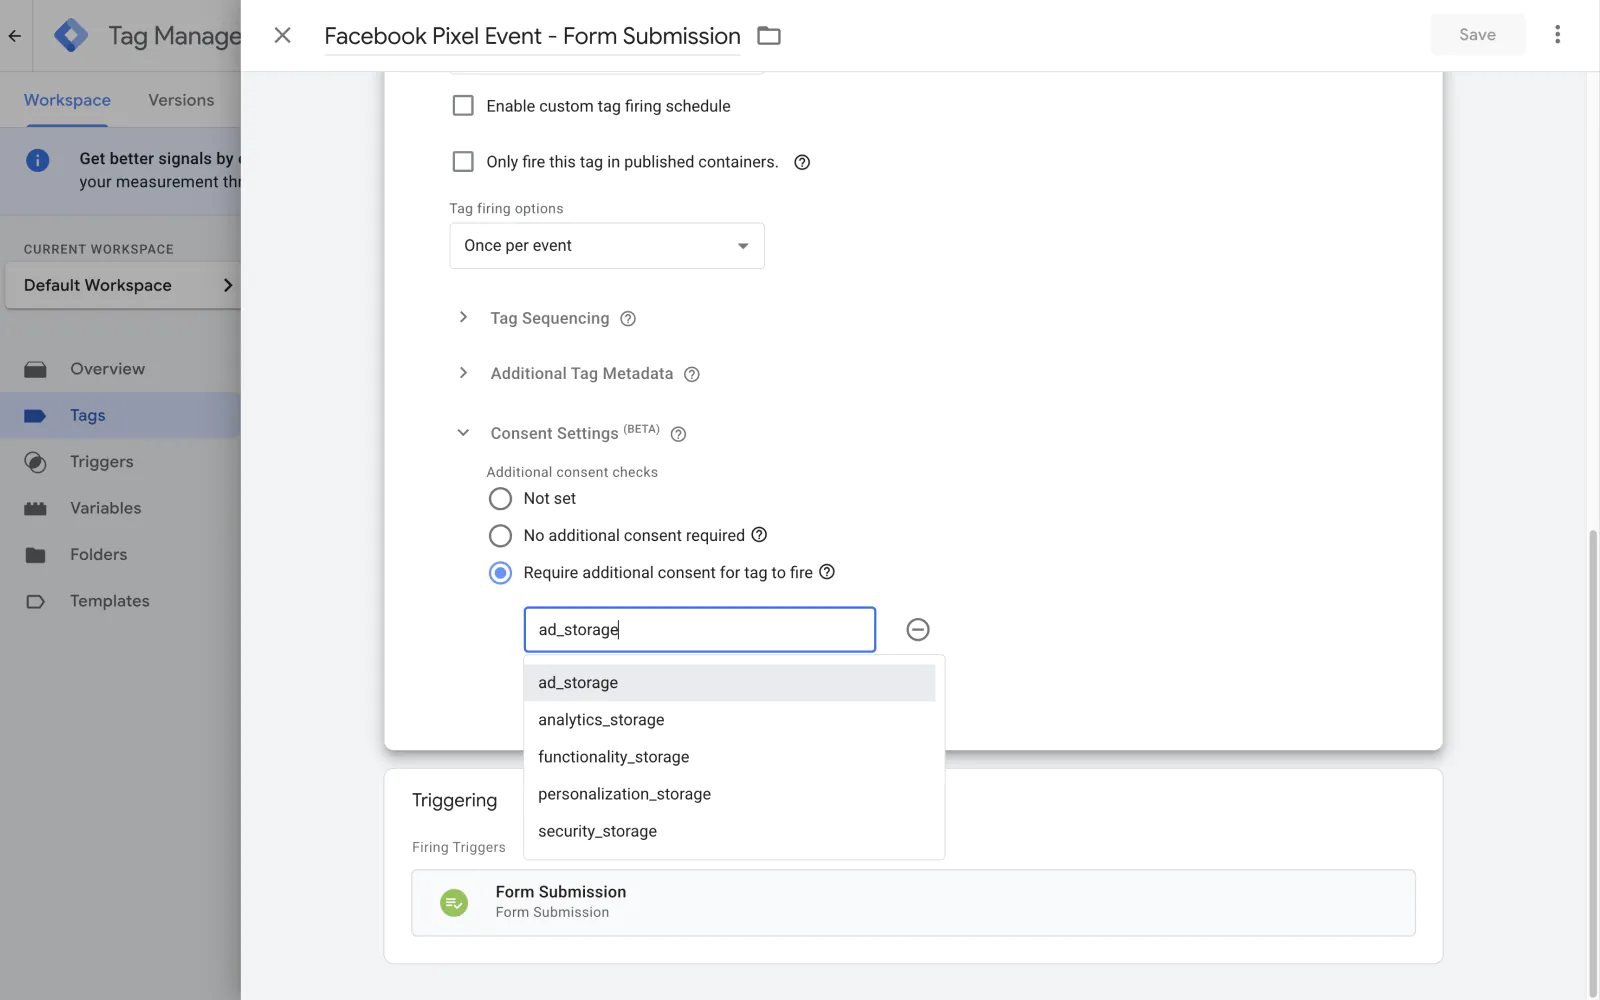
Tags WITHOUT Built-in Consent Checks
For tags without Built-in Consent Checks, you must explicitly configure consent requirements to ensure GDPR compliance. Unlike tags with built-in consent checks, these tags cannot automatically detect user consent preferences. Using standard triggers like All Pages or Page View would cause the tag to fire immediately on every page load, regardless of whether the user has granted consent, violating GDPR requirements.
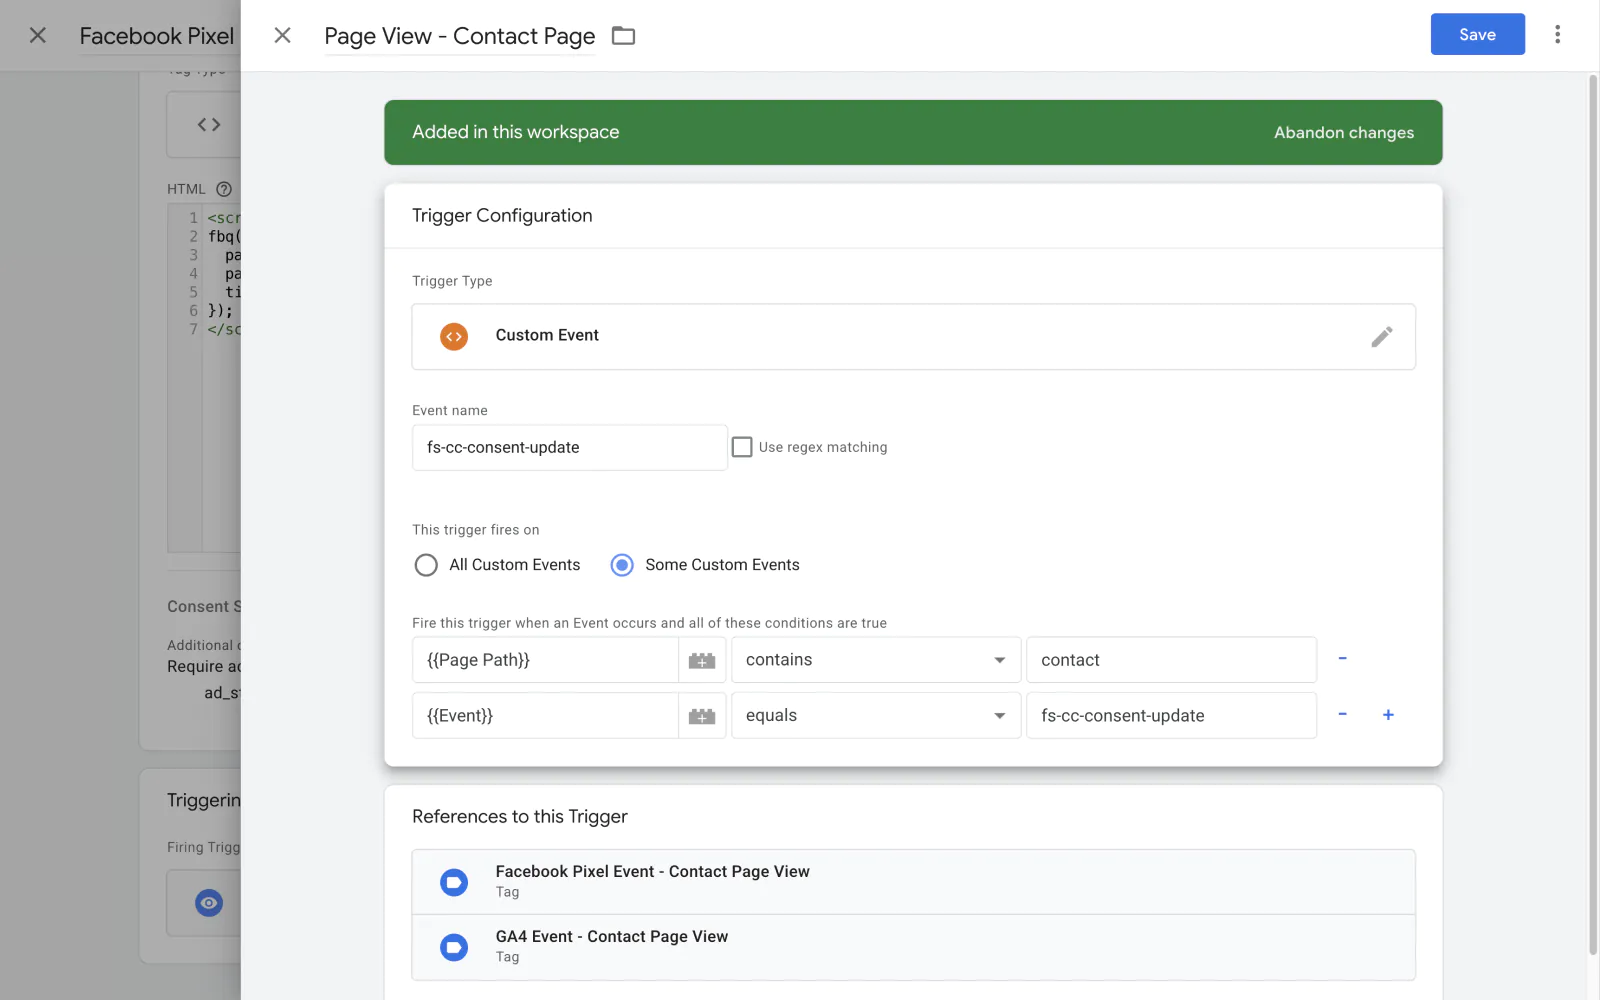
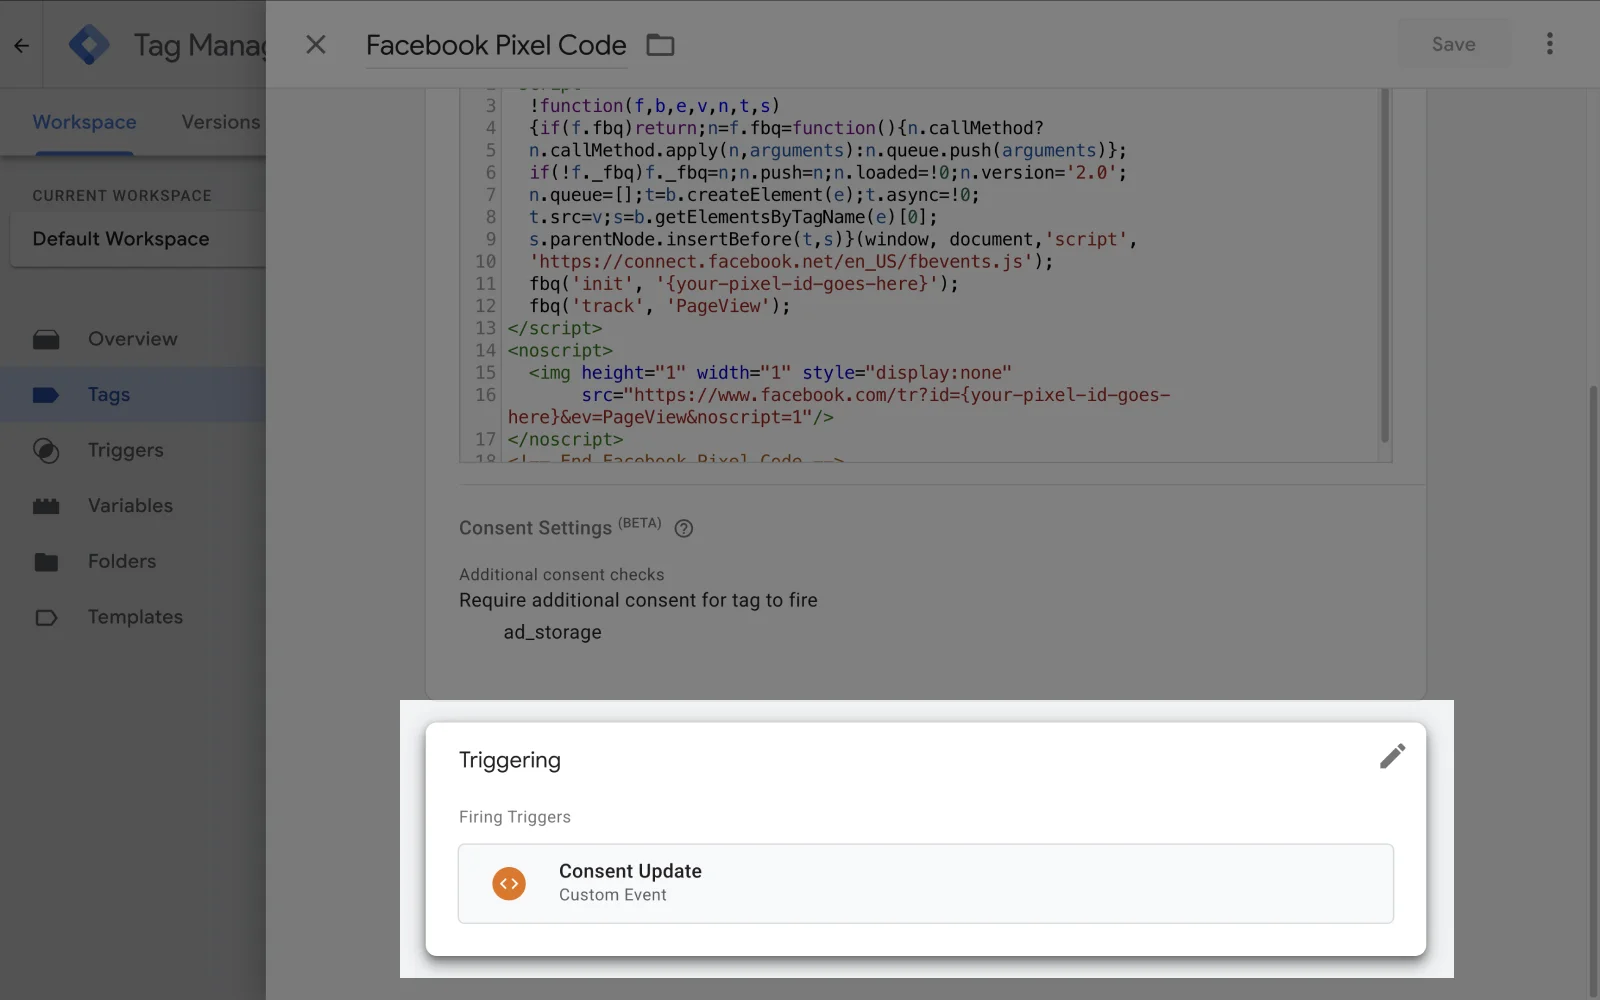
For tags without Built-in Consent Checks that should fire when the page loads (e.g., to track a page view), add the Consent Update custom event trigger. This trigger fires when:
- Initial page load (after consent banner initialization)
- Consent preference changes (when users update their cookie settings)
- Subsequent page loads (when consent was previously granted)
Next, under the Advanced Settings dropdown, expand the Consent Settings dropdown and select the appropriate consent types:
ad_storage: Required for Marketing/Advertising cookiesanalytics_storage: Required for Analytics cookiespersonalization_storage: Required for Personalization cookies- Select multiple types if your tag requires various cookie categories

For tags without Built-in Consent Checks that track custom events (e.g., a form submission), add the desired custom trigger (e.g., Form Submission, Click trigger). Next, under the Advanced Settings dropdown, expand the Consent Settings dropdown and select the appropriate consent types:
ad_storage: Required for Marketing/Advertising cookiesanalytics_storage: Required for Analytics cookiespersonalization_storage: Required for Personalization cookies- Select multiple types if your tag requires various cookie categories
Tip: To fire a tag without Built-in Consent Checks only on specific pages (e.g., contact page only), duplicate the Consent Update trigger, add a Page Path condition filter to restrict firing to specific URLs, and apply this customized trigger to your tag.
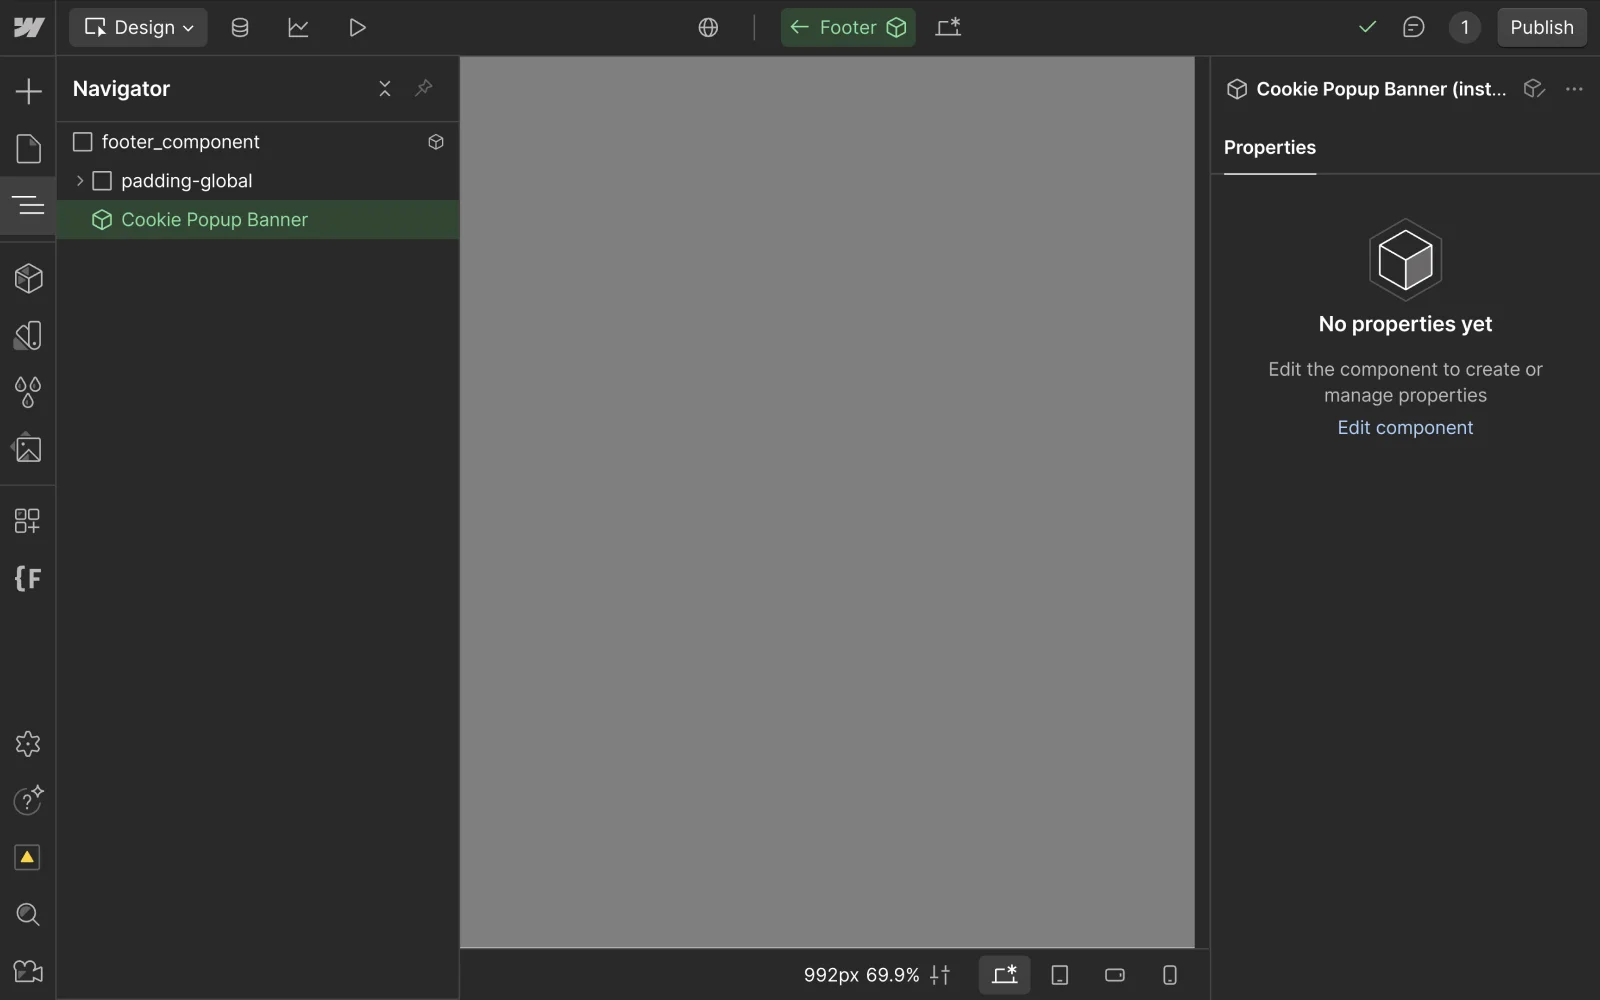
To edit the Cookie Banner content, open the Webflow Designer and locate the 'Cookie Popup Banner' component. This is usually located within the 'Footer' or 'Nav' component.
To make the banner visible for editing, change the .fs-cc-banner_component element's display setting to display: block.
Now that the banner is visible, you can modify any text element, including updating the privacy policy link and its destination.
Once you've finished editing the content, set the .fs-cc-banner_component element’s display style back to display: none and publish the website.
To localize the content of the Cookie Banner for different regions, open the Webflow Designer and locate the 'Cookie Popup Banner' component. This is usually located within the 'Footer' or 'Nav' component.
To make the banner visible for editing, change the .fs-cc-banner_component element's display setting to display: block.
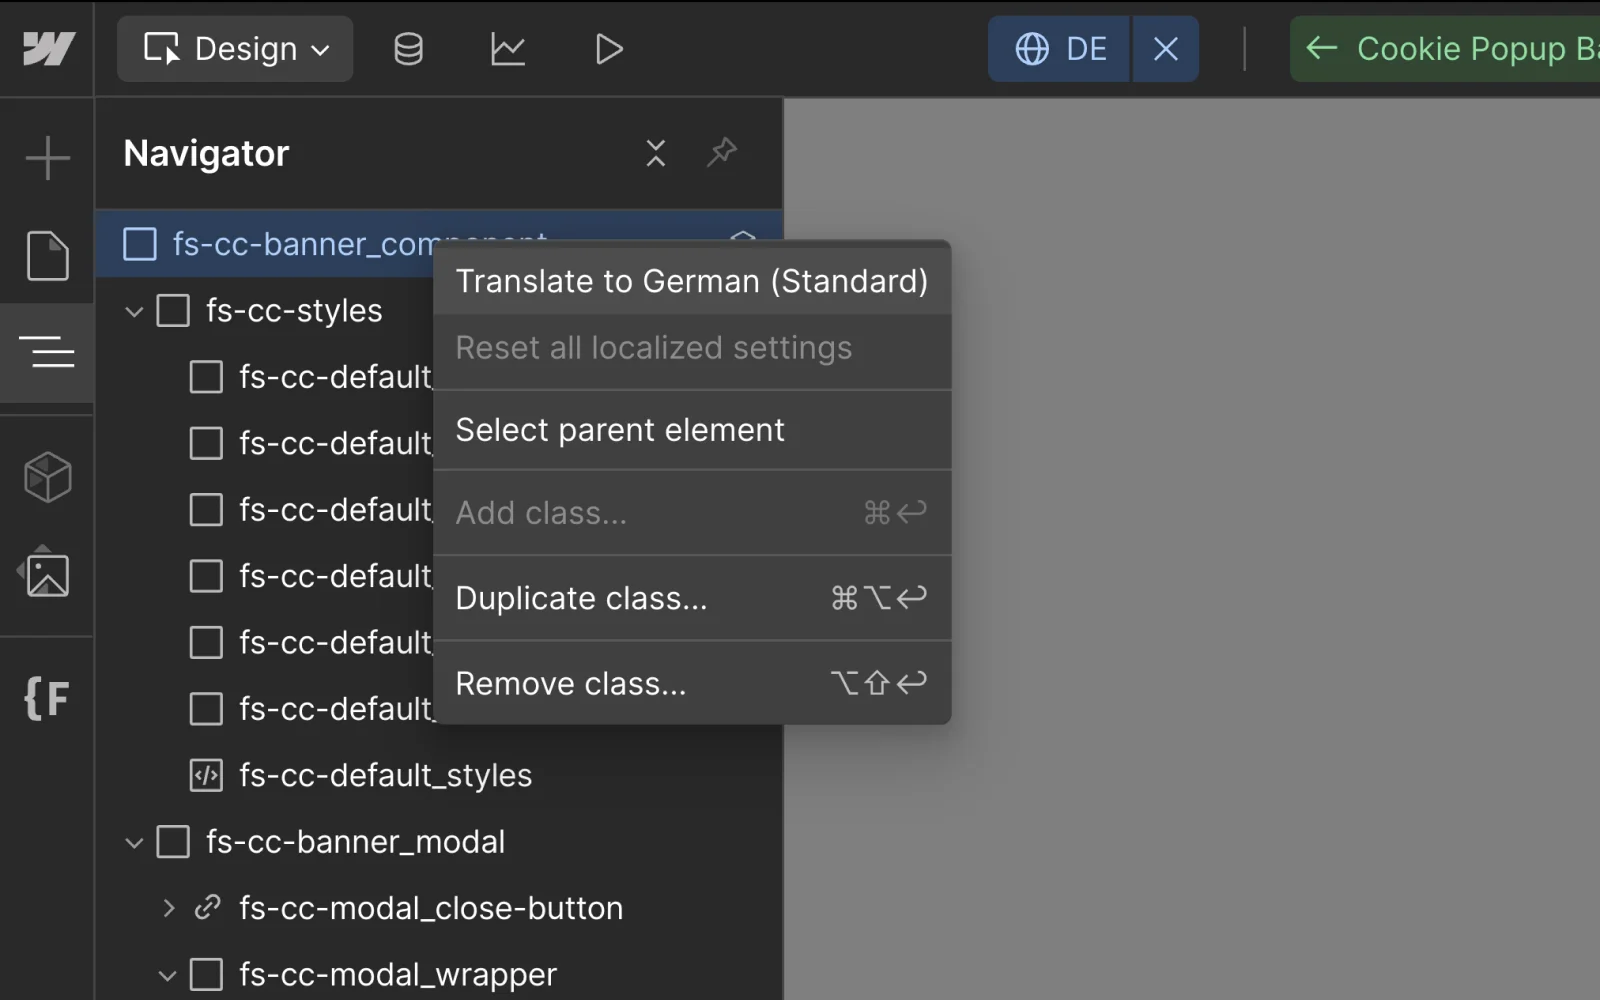
Select the desired locale from the top bar within the Webflow Designer.
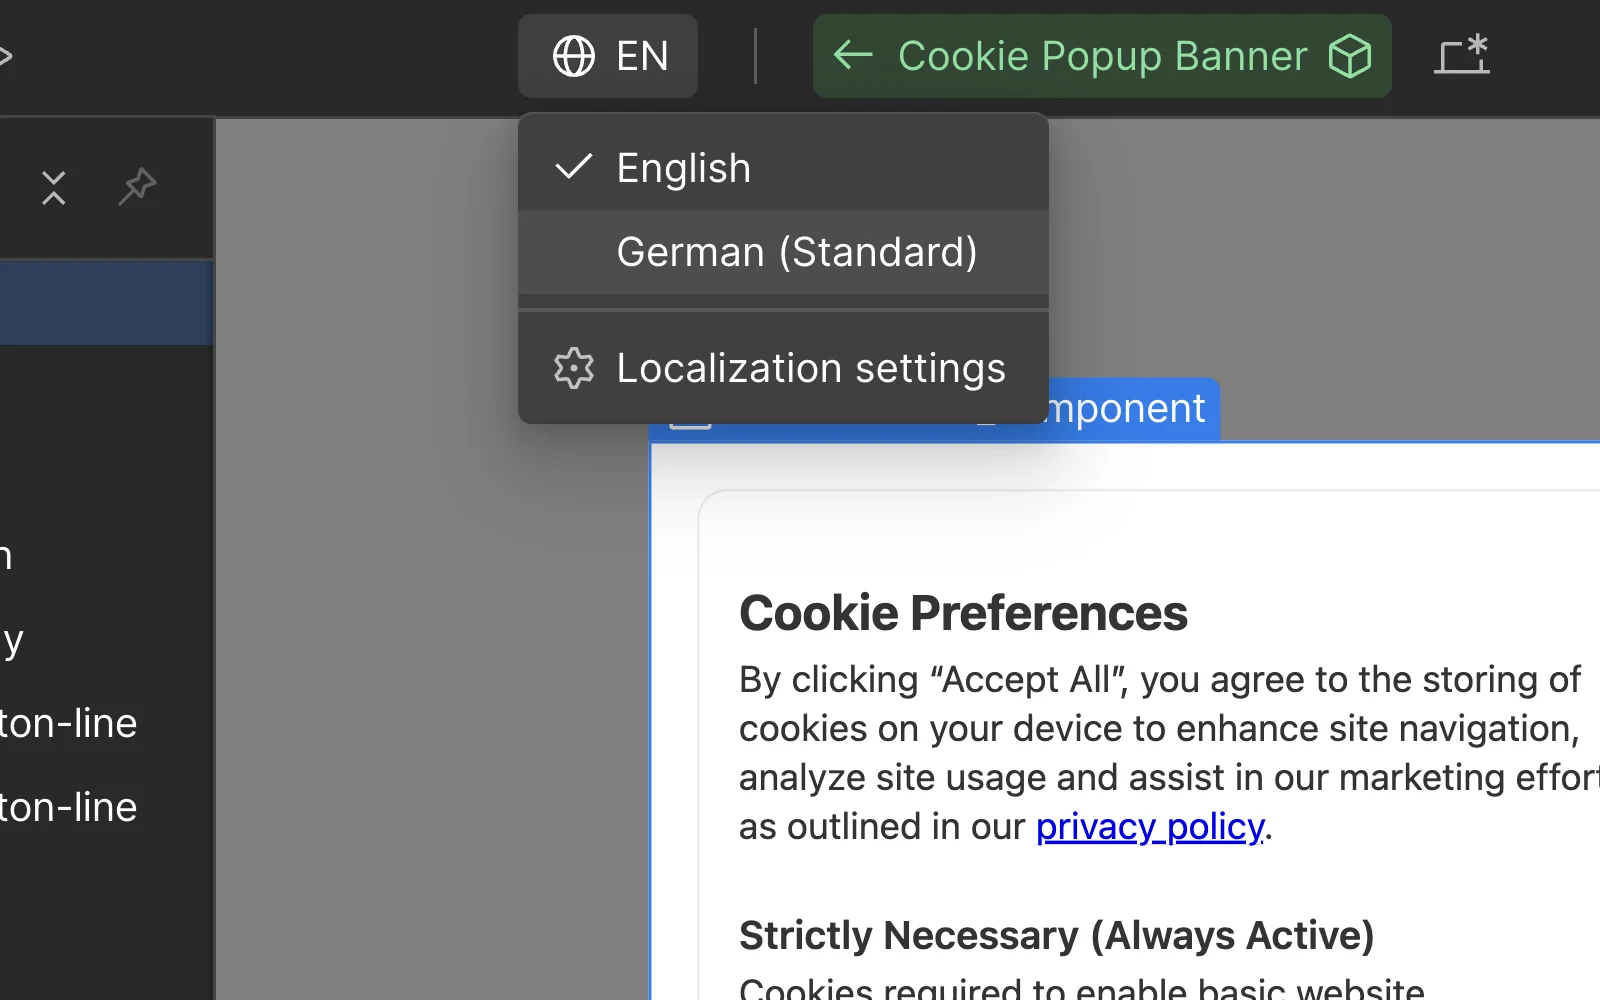
Select the .fs-cc-banner_component element from the navigator panel, and click the ‘Translate to Locale‘ button. Review the translations and adjust as needed.
Once you've finished editing the content, go back to the primary locale, set the .fs-cc-banner_component element's display style to display: none and publish the website.
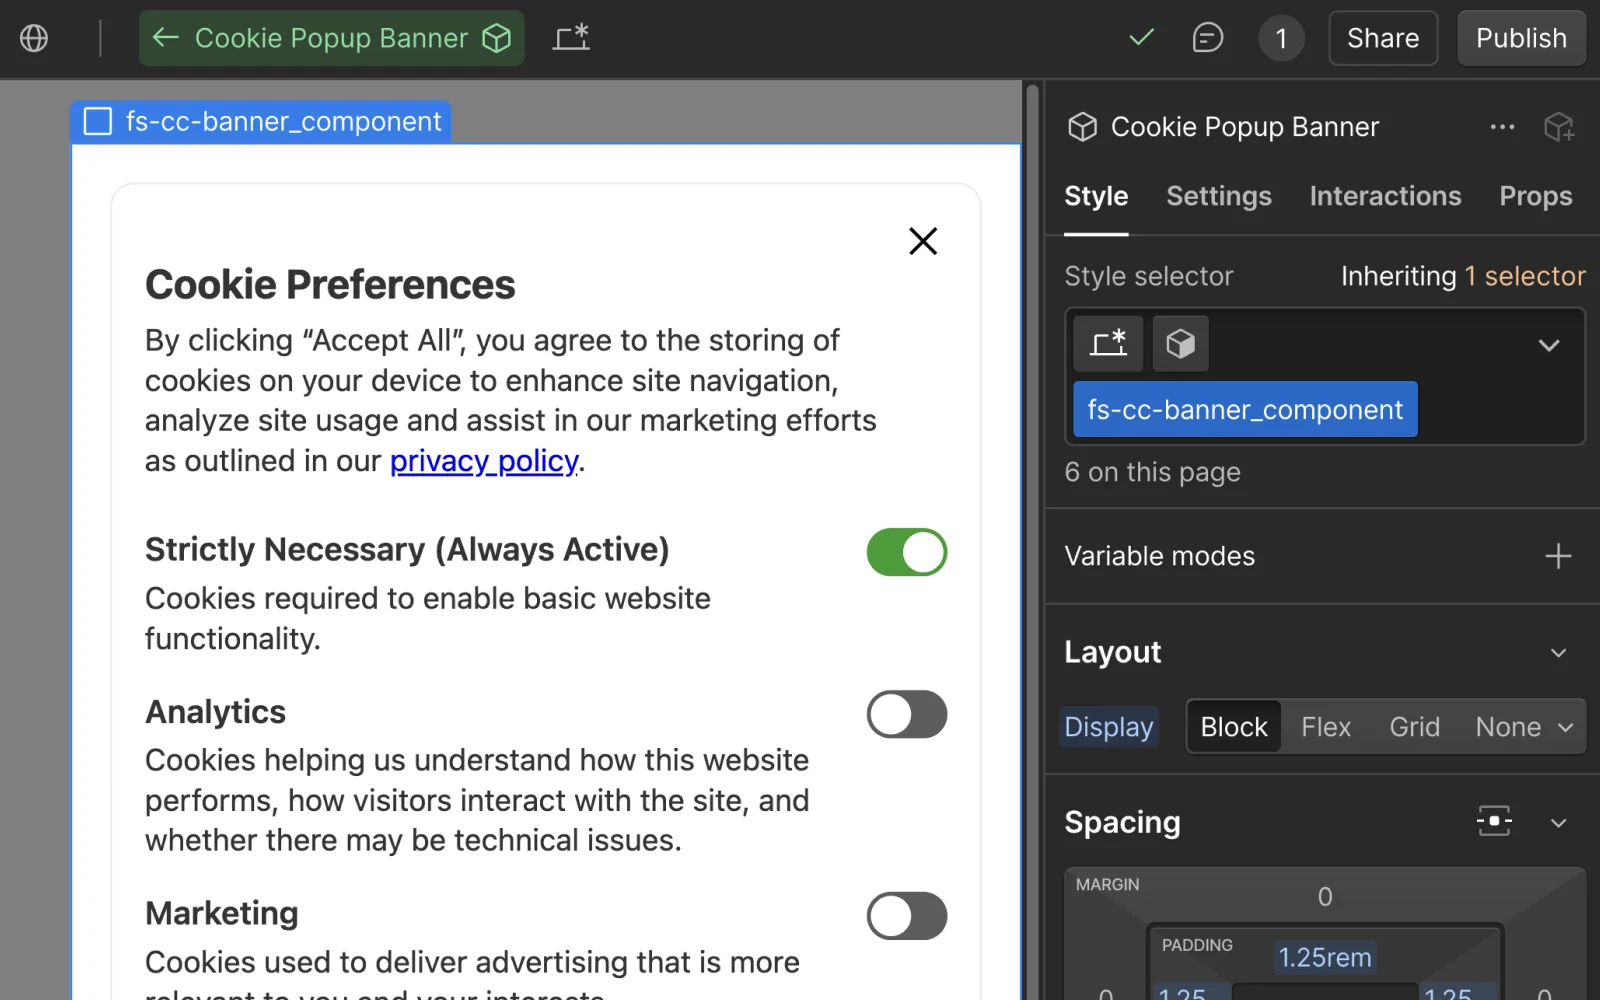
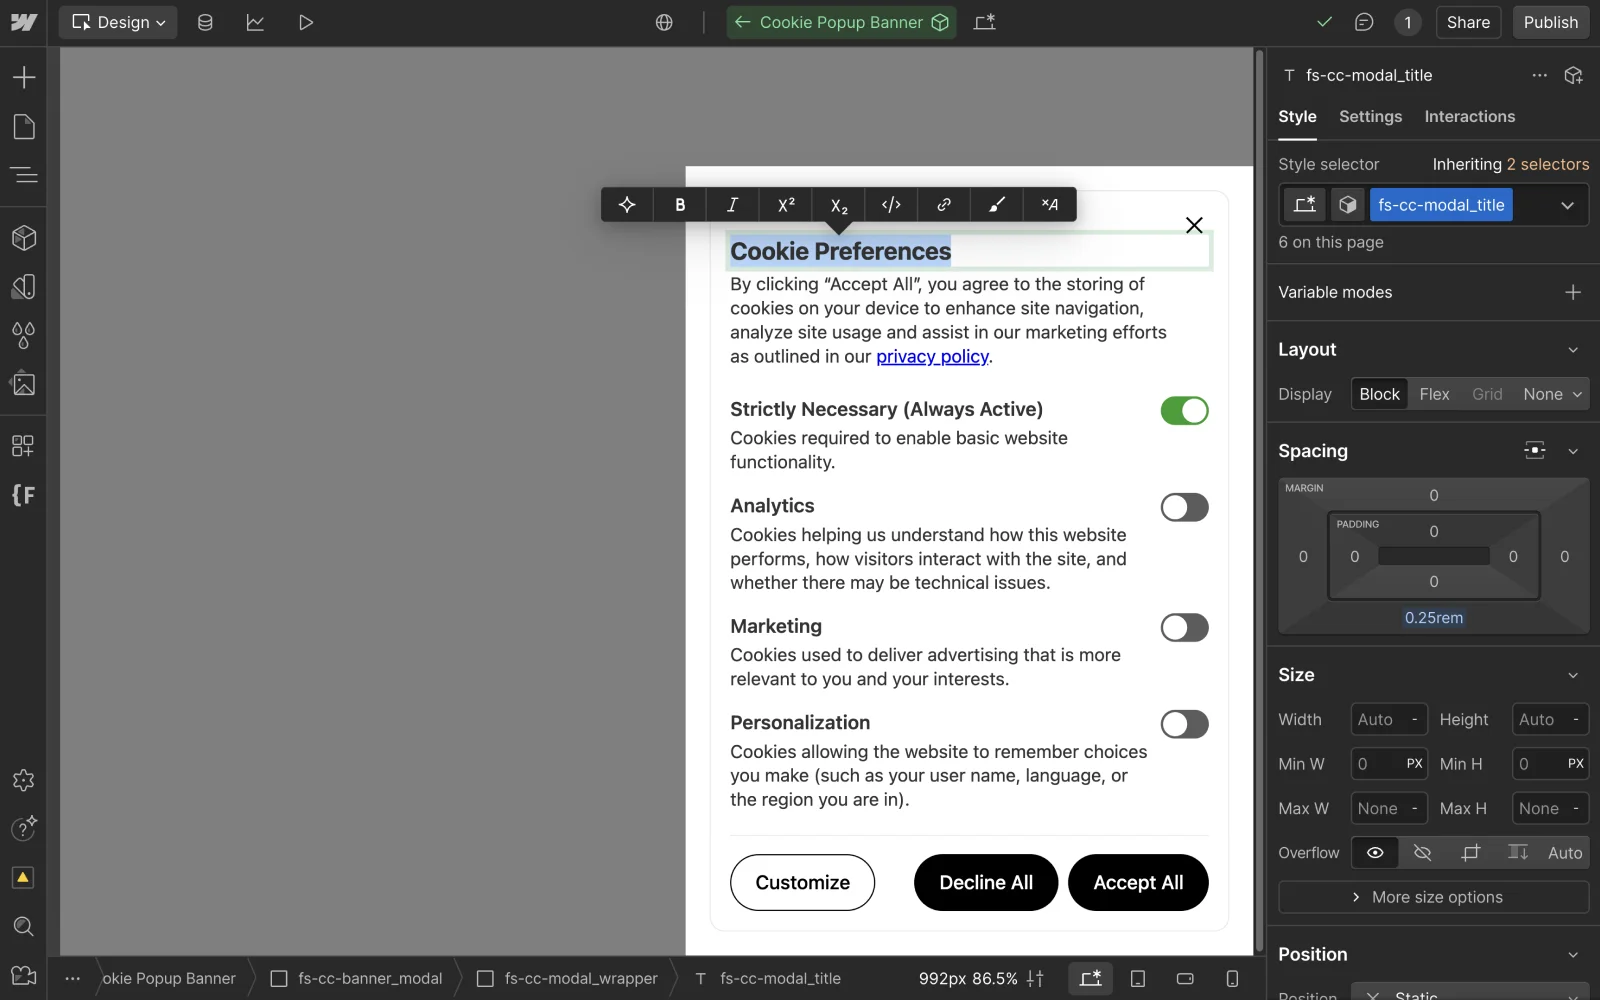
To change the design of the Cookie Banner, open the Webflow Designer and locate the 'Cookie Popup Banner' component. This is usually located within the 'Footer' or 'Nav' component.
To make the banner visible for editing, change the .fs-cc-banner_component element's display setting to display: block.
Expand the .fs-cc-styles element in the Navigator panel to access the styling classes. Use these styling classes to change the cookie banner’s design.
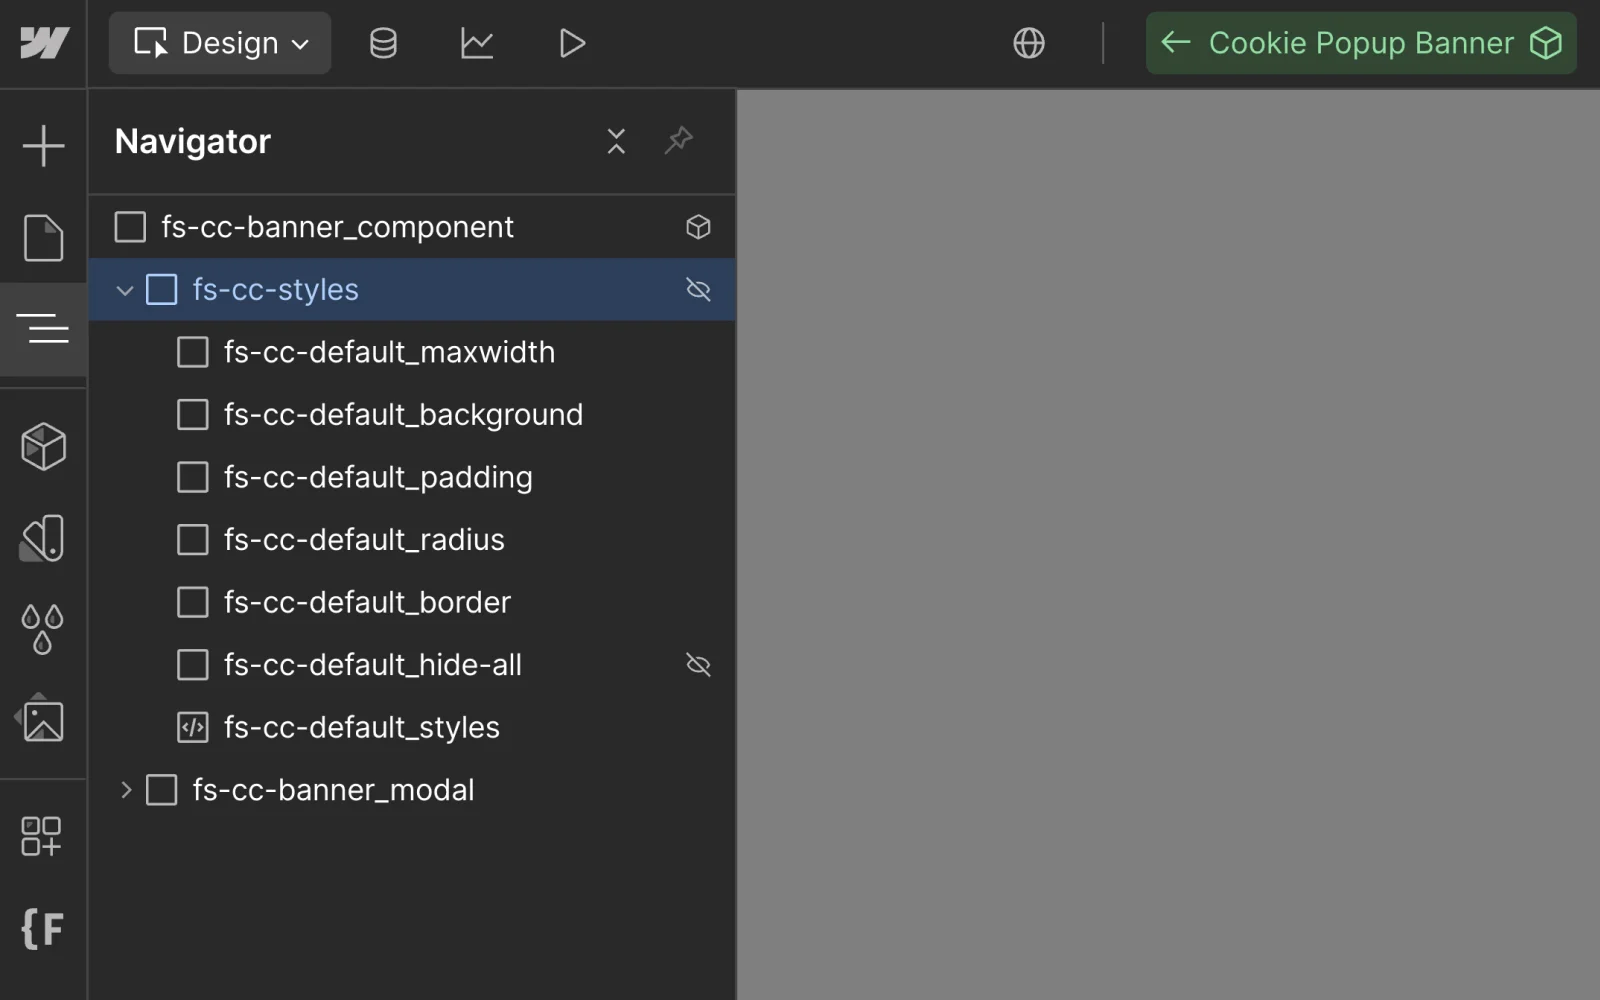
Optionally, style the following elements:
.fs-cc-banner_component.fs-cc-button.fs-cc-modal_title.fs-cc-modal_link.fs-cc-prefs_checkbox-toggle
Third-Party Scripts & Embeds
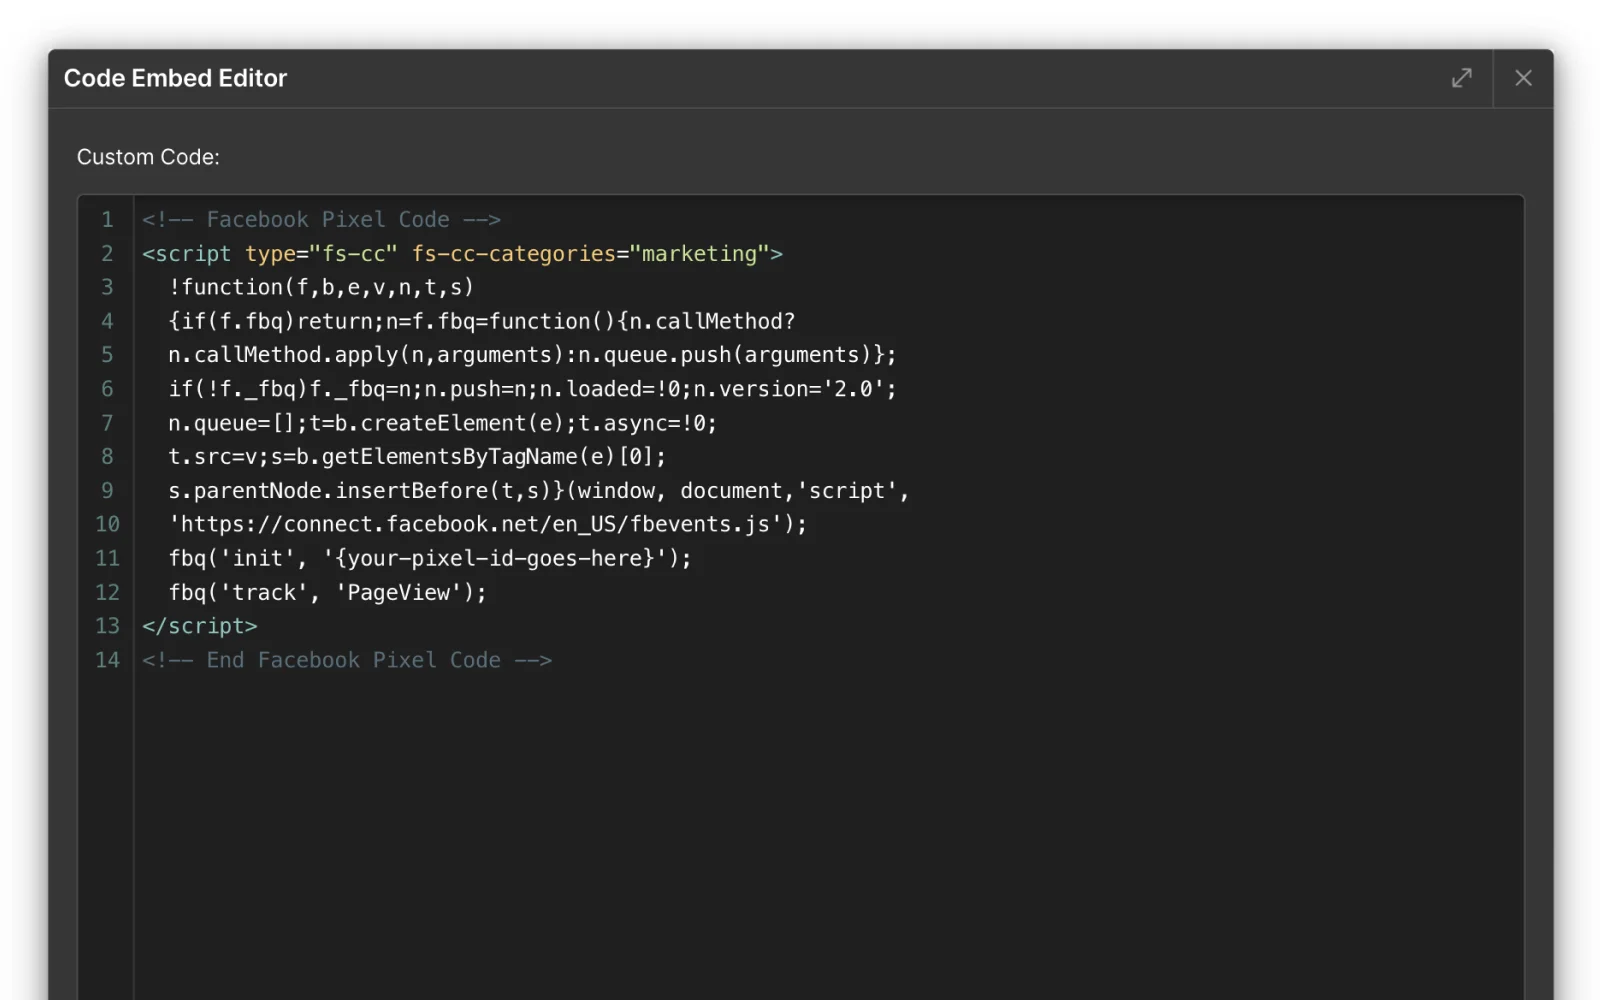
To make a third-party script that produces cookies GDPR-compliant, and ensure the code only loads after a user grants relevant permission, add a type="fs-cc" and fs-cc-categories="{Categories}" attribute to the <script> tag.
Set the {categories} variable based on the type of cookies the script produces (Analytics, Marketing or Personalization), e.g.:
- Marketing cookies:
fs-cc-categories="marketing" - Analytics cookies:
fs-cc-categories="analytics" - Multiple cookie types:
fs-cc-categories="analytics, marketing, personalization"
Lastly, remove all <noscript> tags, as they are not GDPR-compliant.
To make a <iframe> tag that produces cookies GDPR-compliant, and ensure the code only loads after a user grants relevant permission, replace the src attribute with a fs-cc-src and add a fs-cc-categories="{Categories}" attribute.
Set the {categories} variable based on the type of cookies the iframe produces (Analytics, Marketing or Personalization), e.g.:
- Marketing cookies:
fs-cc-categories="marketing" - Analytics cookies:
fs-cc-categories="analytics" - Multiple cookie types:
fs-cc-categories="analytics, marketing, personalization"

Tip: Add a user-friendly placeholder element that displays before consent is granted by following this guide.
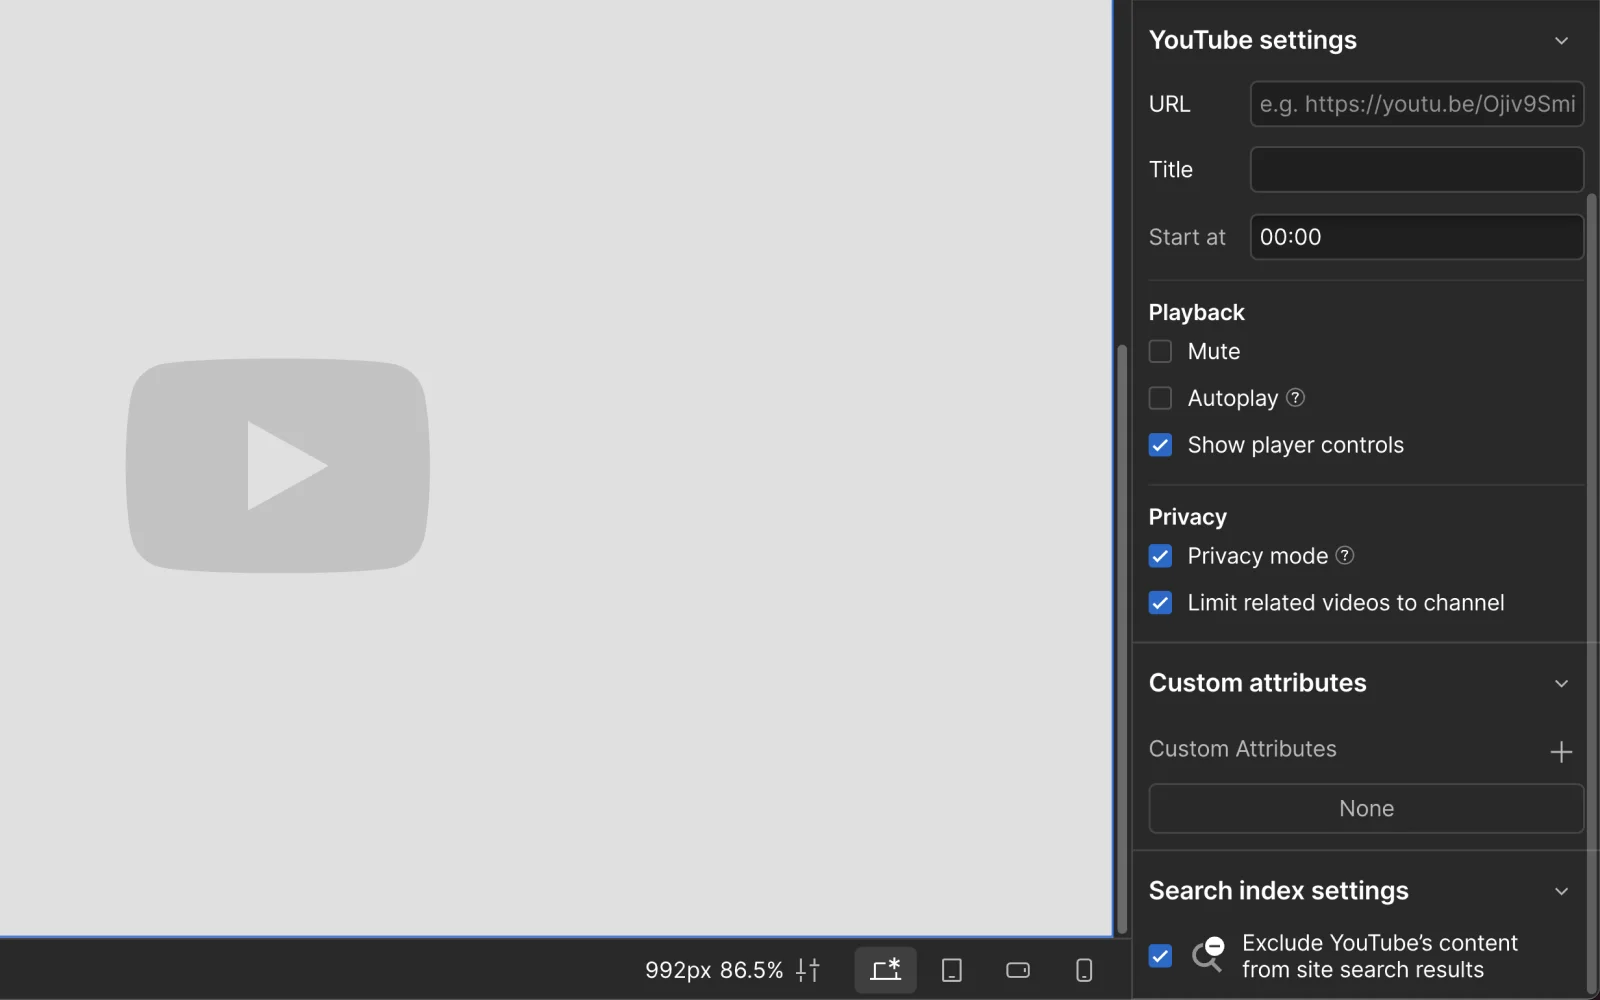
When using the native YouTube Player in Webflow, enable the ‘Privacy mode’ checkbox to embed videos without using cookies.
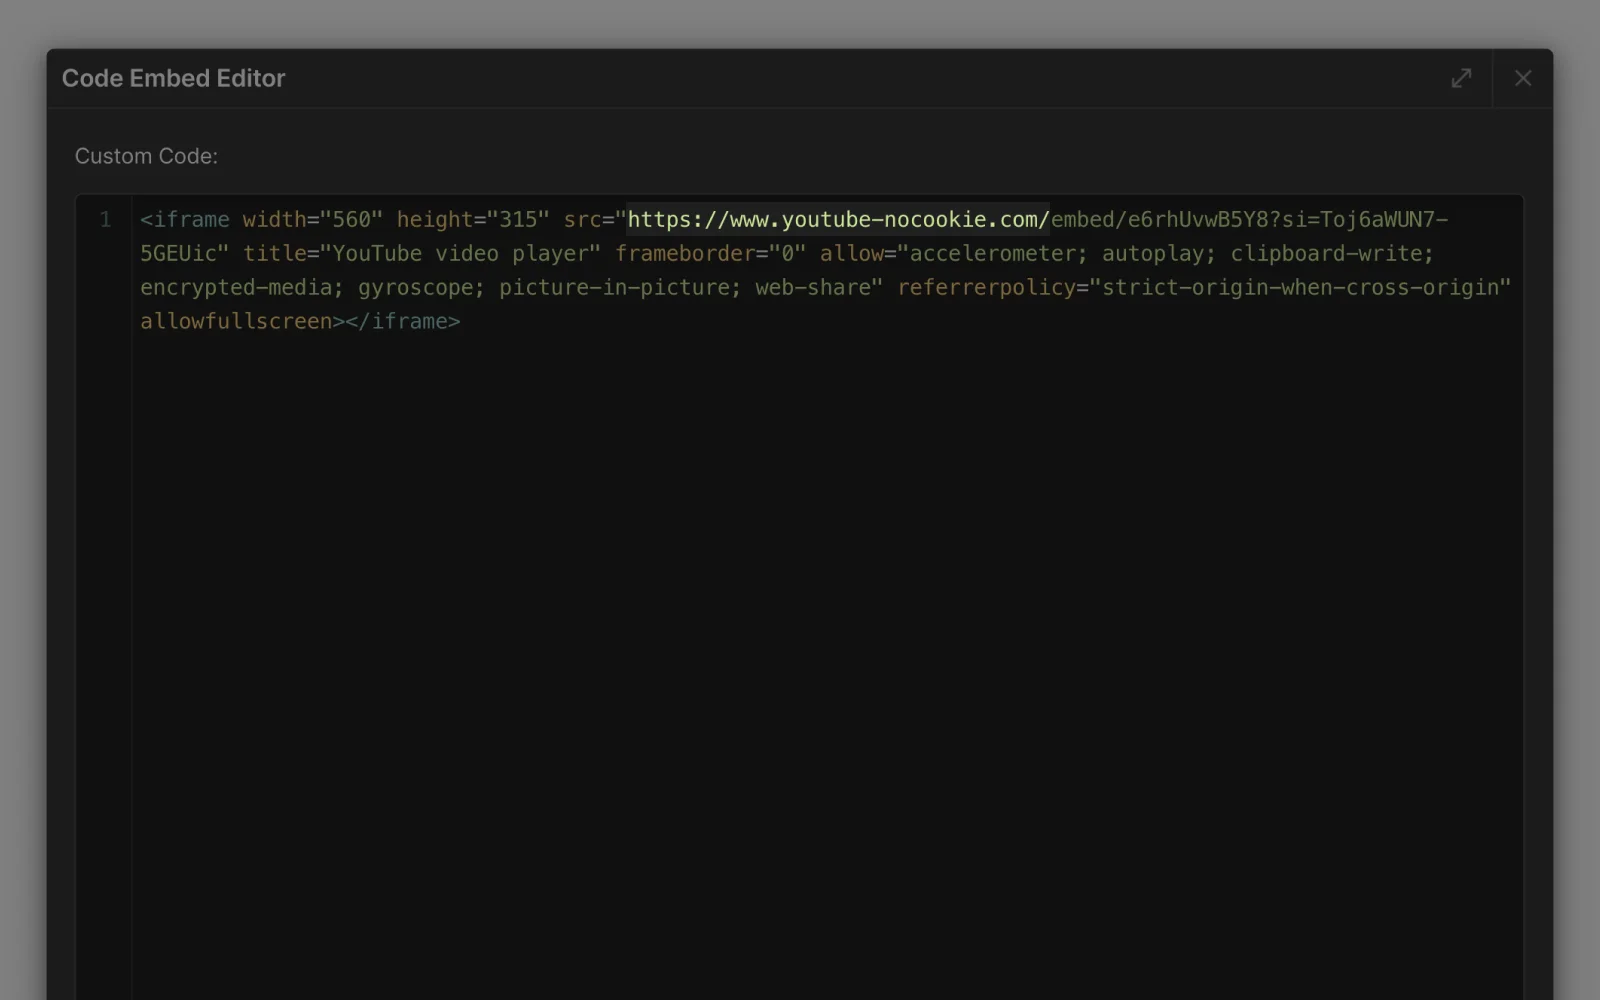
When embedding YouTube videos in a Code Embed, replace the domain name from https://www.youtube.com/ to https://www.youtube-nocookie.com/ in the src attribute while retaining the rest of the URL.
Tip: For the highest level of compliance, we recommend loading YouTube videos only after the user granted cookie permissions following this guide.
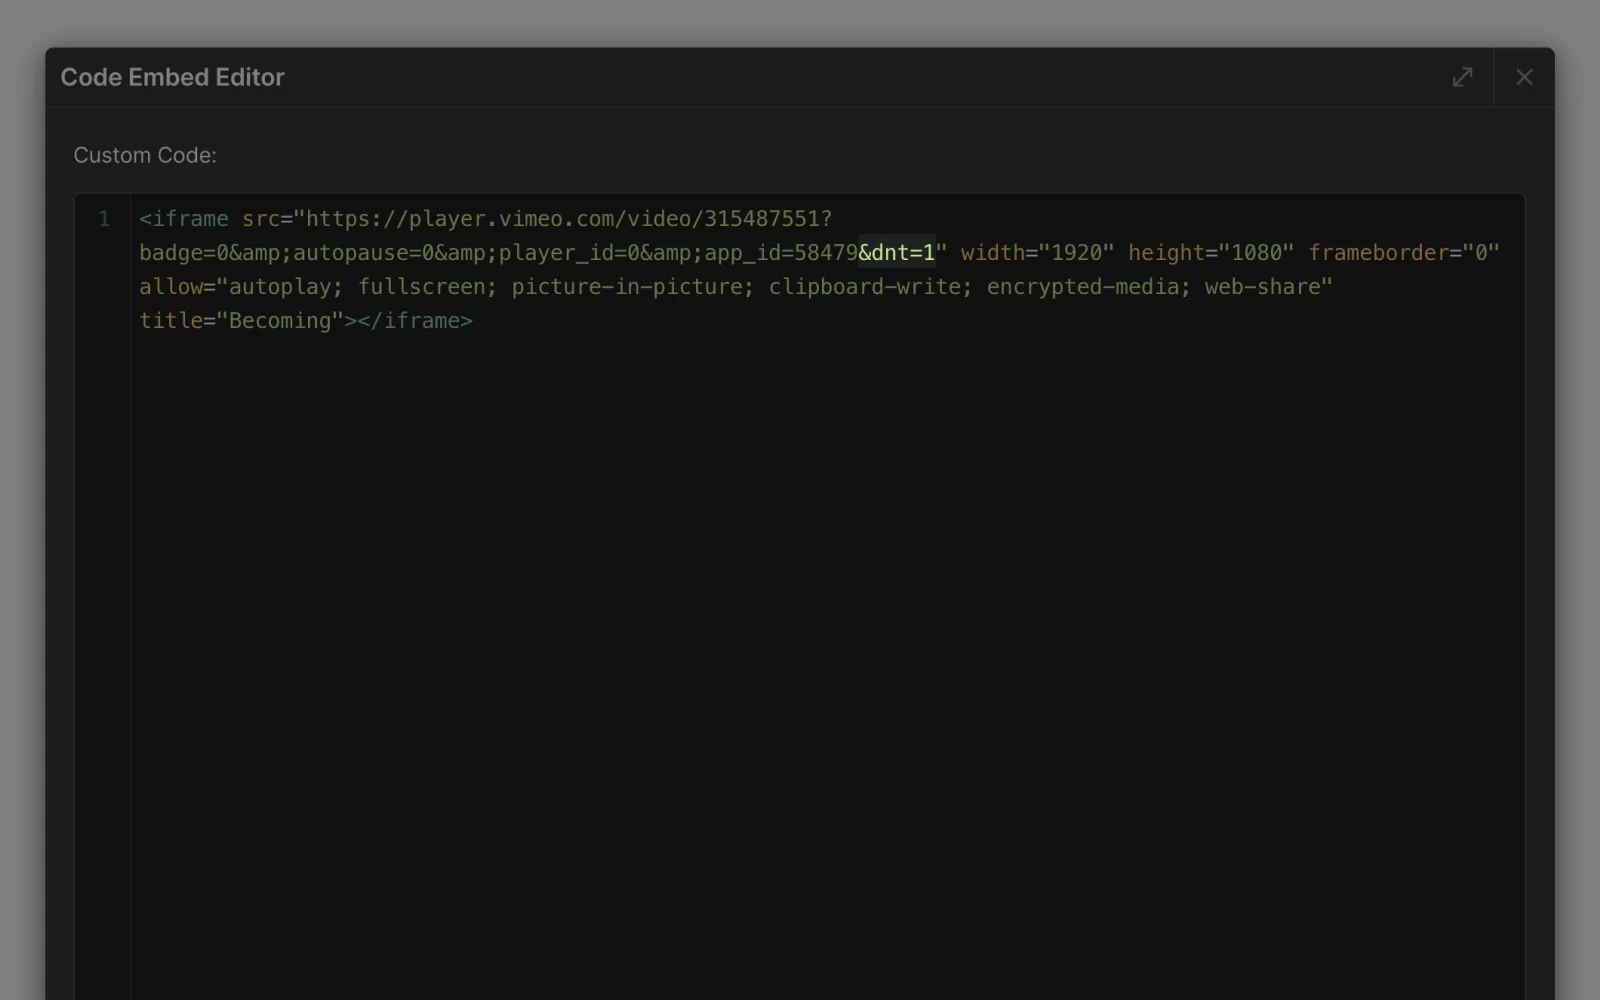
When embedding Vimeo videos in a Code Embed, add a &dnt=1 parameter (Do Not Track) to the end of the video URL. This ensures Vimeo videos are loaded without any cookies.
Tip: For the highest level of compliance, we recommend loading Vimeo videos only after the user granted cookie permissions following this guide.
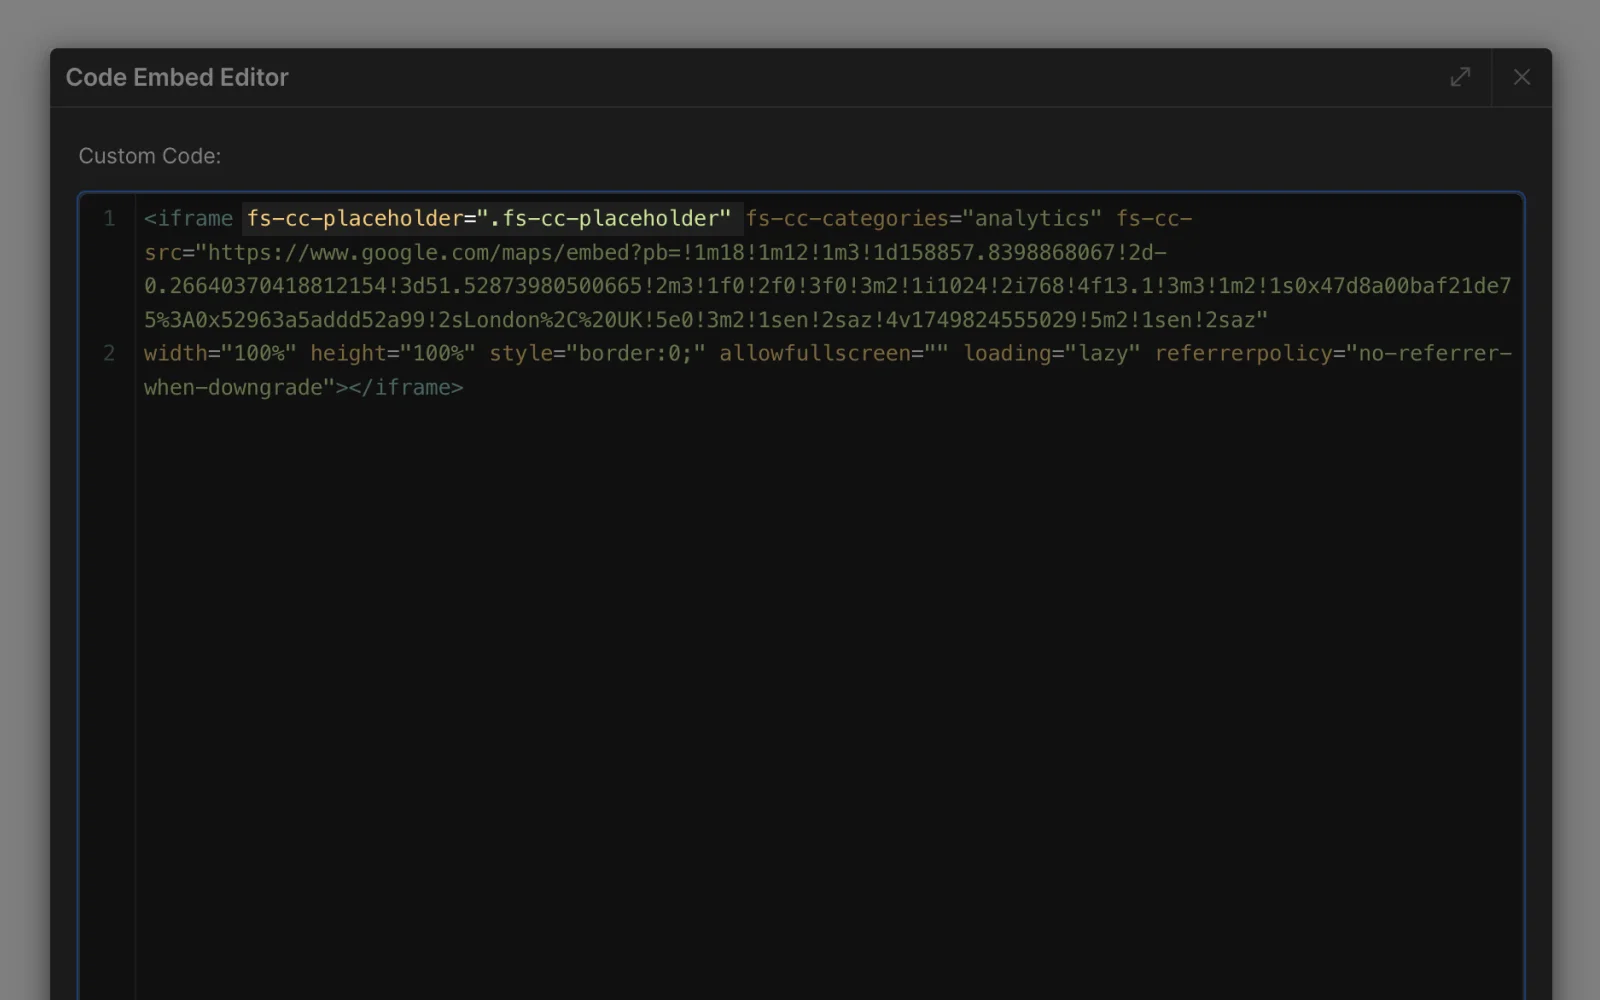
To load Google Maps in a GDPR-compliant way, add a Google Maps iframe to a Code Embed, replace the src attribute with fs-cc-src and add a fs-cc-categories="analytics" attribute.
Tip: Add a user-friendly placeholder element that displays before consent is granted by following this guide.
To create an element that acts as a placeholder, add a fs-cc-placeholder=".fs-cc-placeholder" attribute to a script or iframe tag that should load only after a user grants relevant consent permissions.
Next, create an element in the Webflow Designer and apply the .fs-cc-placeholder class to it. Style it according to your preferences.
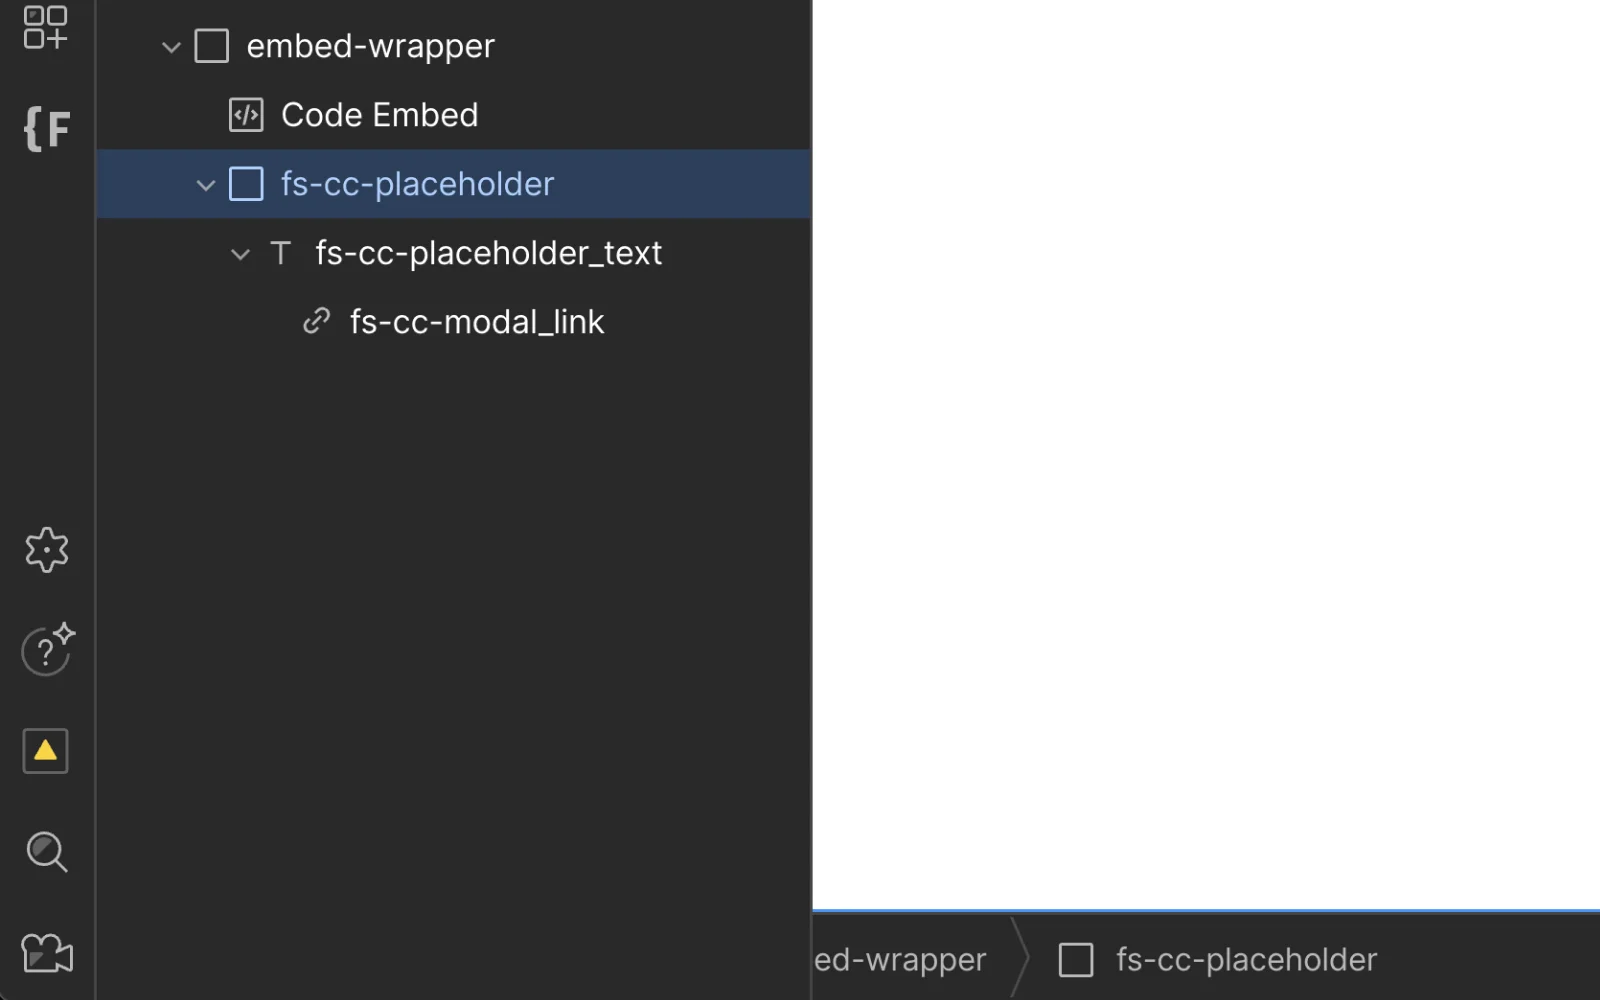
To make a div block, link or image element open the cookie banner when clicked, create a new element inside the .fs-cc-placeholder element and add fs-cc=”open-banner” attribute to it.
Tip: If there are multiple instances of the placeholders on the page, use a unique class name for each (e.g.: .fs-cc-placeholder-2 and .fs-cc-placeholder-3) and update the fs-cc-placeholder attribute values inside the Code Embeds accordingly.
Advanced & Troubleshooting
<noscript> tags are not GDPR-compliant. <noscript> tags execute automatically when JavaScript is disabled in a user's browser, bypassing the installed cookie consent mechanism.
To maintain GDPR compliance, it is required to remove all <noscript> tags from your Webflow site.
The "Additional Domains Detected For Configuration" warning in Google Tag Manager (GTM) appears because GTM is detecting the Webflow staging (webflow.io) domain. This warning can be ignored, and the staging domain does not need to be configured in the Conversion Linker Tag.
If you installed GTM across multiple production domains, then add all production domains to the Conversion Linker Tag (excluding the webflow.io staging domain).
A reduction in reported Google Analytics (or other tracking tools) is expected after installing a GDPR-compliant cookie banner. This reduction occurs because 40 to 60% of site visitors decline cookies or don't interact with the Cookie Banner , preventing tracking scripts from loading. This reflects the privacy-conscious behavior of your website visitors.
If you notice a more significant drop, please verify that your Google Tag Manager (GTM) container has been published as outlined here.
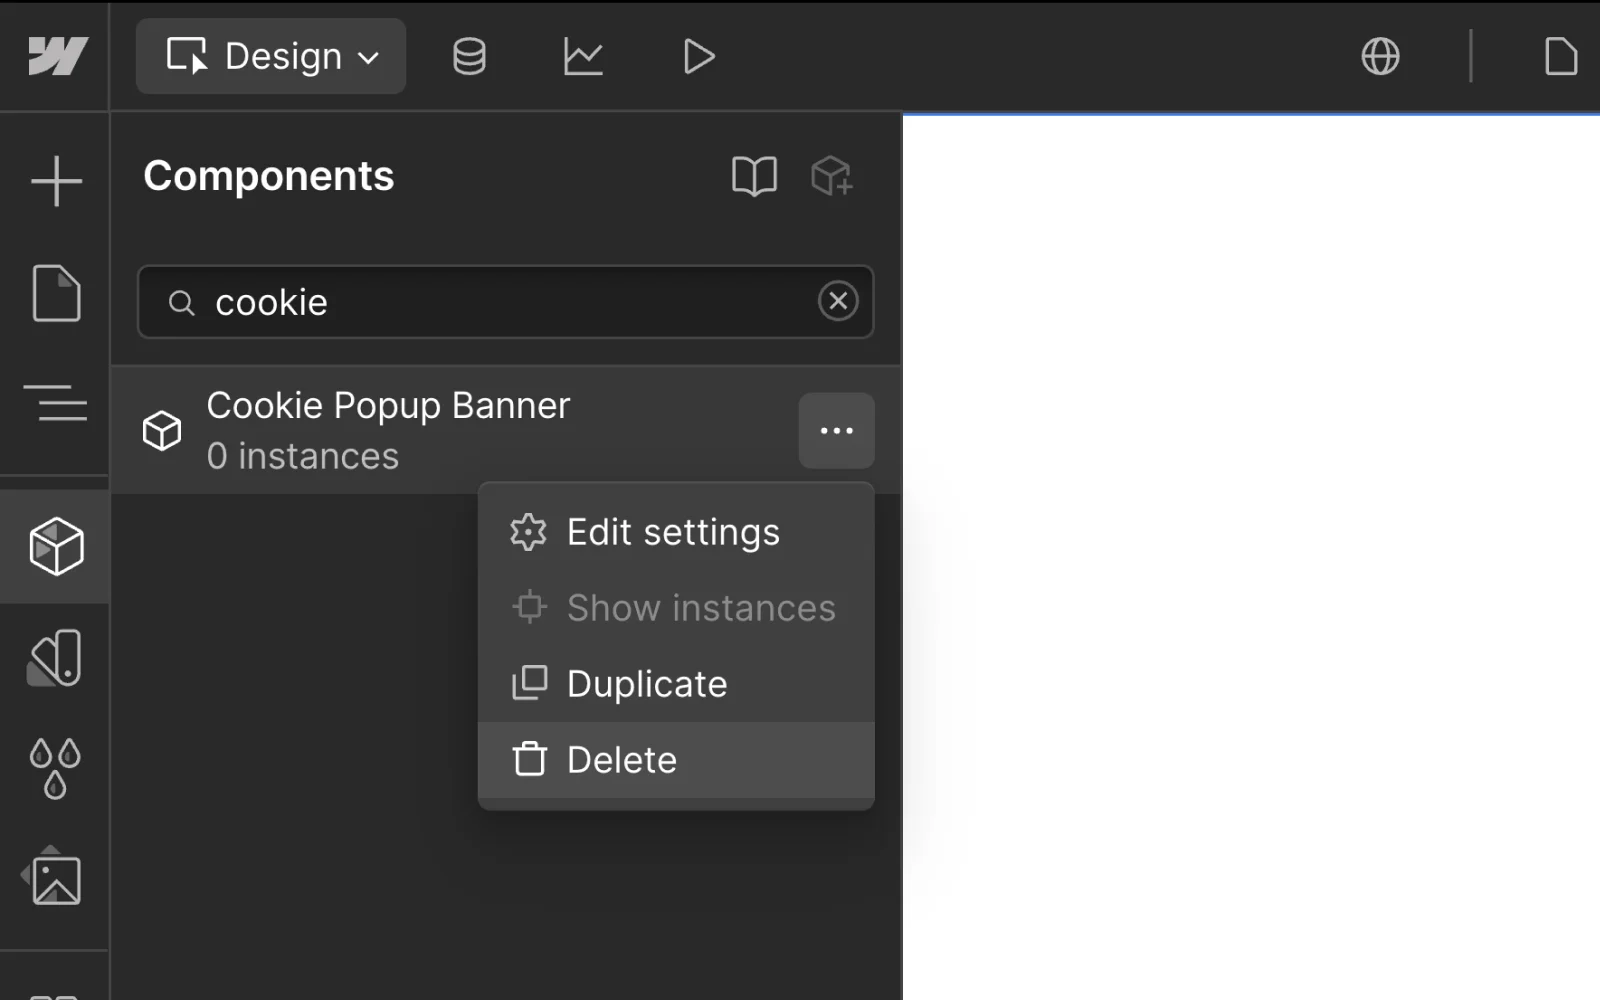
To remove the Cookie Banner from your Webflow site, open the components menu in the Webflow Designer, search for the cookie banner, and click ‘Show instances’. Delete all instances of the cookie banner component.
Navigate to the ‘Custom Code’ tab in the Webflow Project Settings, and delete the script between the <!-- Digital Sparks Cookie Consent--> comments. Save and publish your website.
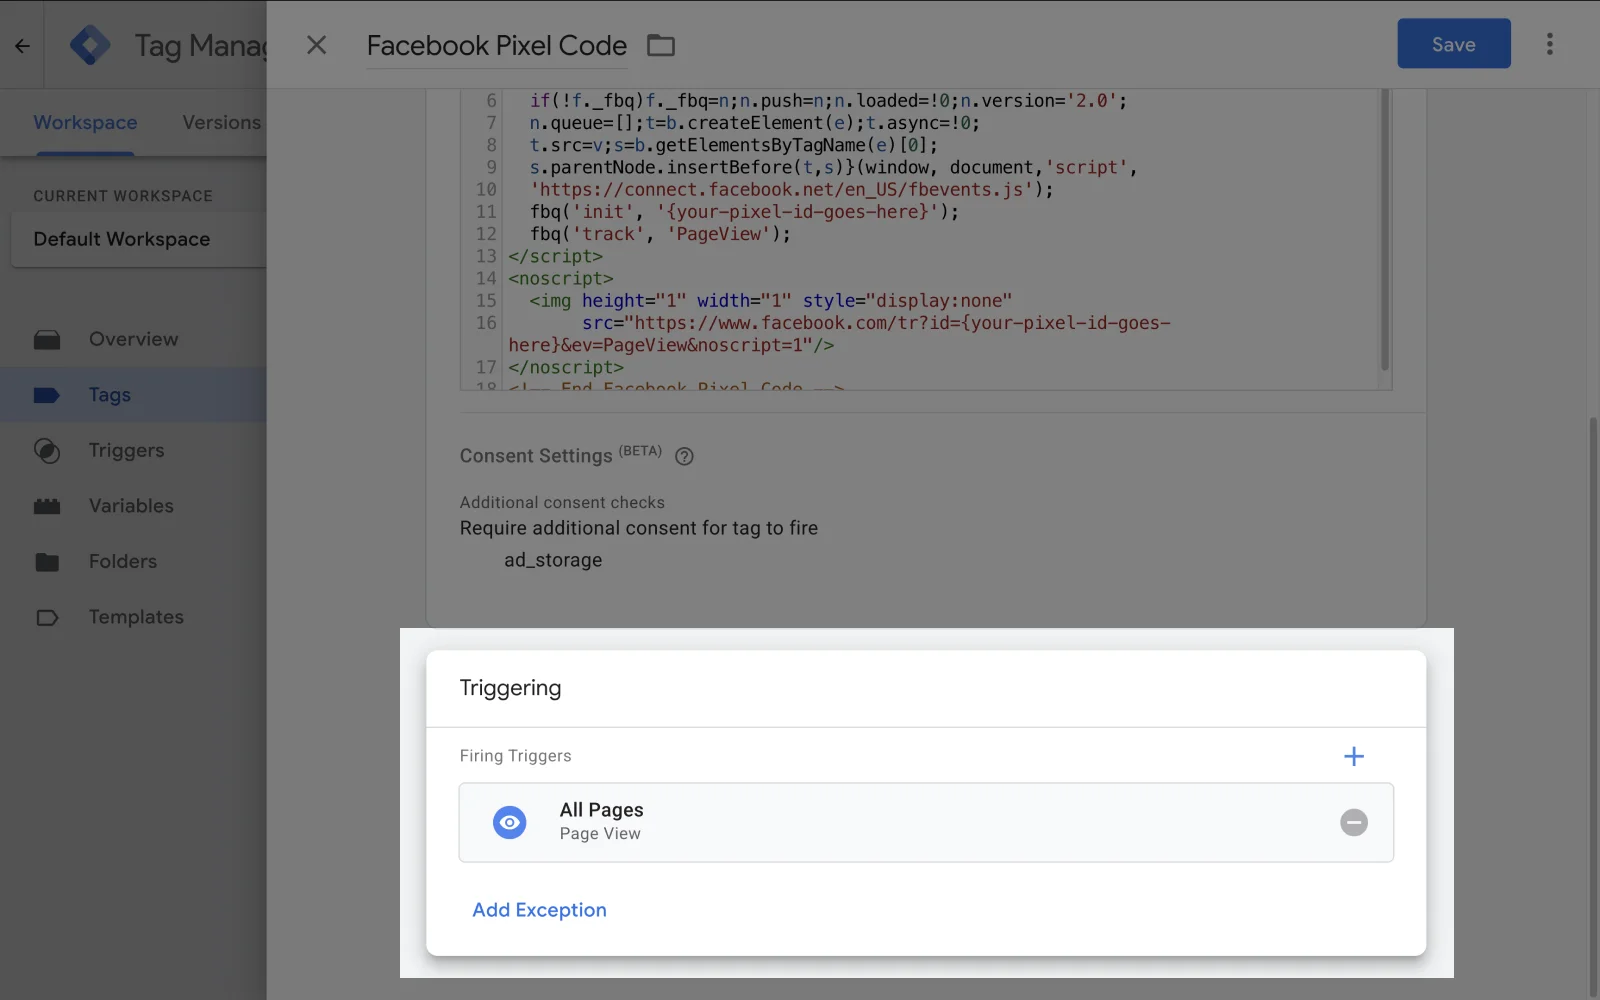
Open the Google Tag Manager container and replace the trigger with ‘All Pages’ for tags that use the ‘Consent Update’ trigger.
For all the tags, set the ‘Additional consent checks’ settings to ‘Not set’. This can be achieved by opening the ‘Advanced Settings’ for each tag. Publish the Google Tag Manager container.
Please note these changes remove GDPR-compliance functionality from your website. Consult with your data analytics/tracking partner to verify the adjusted setup functions as needed.